We are Brows & Lips. Dedicated permanent makeup team and highly skilled international professionals in the cosmetic tattoo industry.

how-to-heal-tattoos-on-breasts-areole-reconstruction-aftercare

Areola Reconstruction Aftercare

Table of Contents

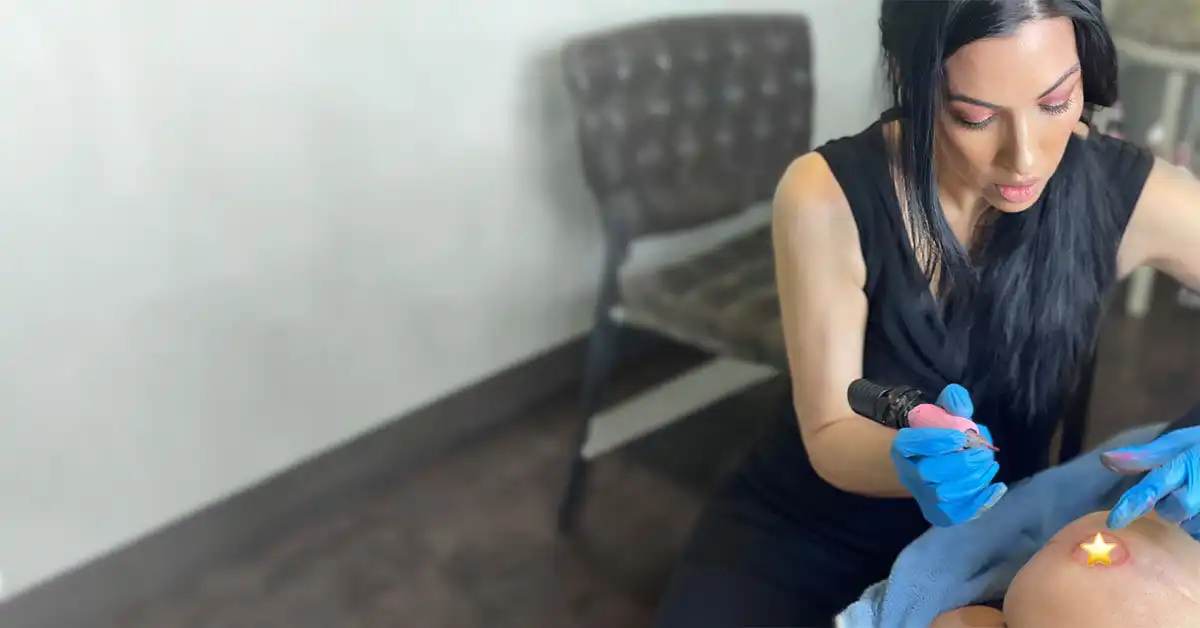
Aftercare Areola Reconstruction

Aftercare for Areola Reconstruction is an essential aspect of the healing process and achieving optimal results after the procedure. Brows & Lips Permanent Makeup Studio provides a comprehensive aftercare regimen to ensure that the treated area heals properly and the pigmentation settles as intended.

Initial Healing Phase:

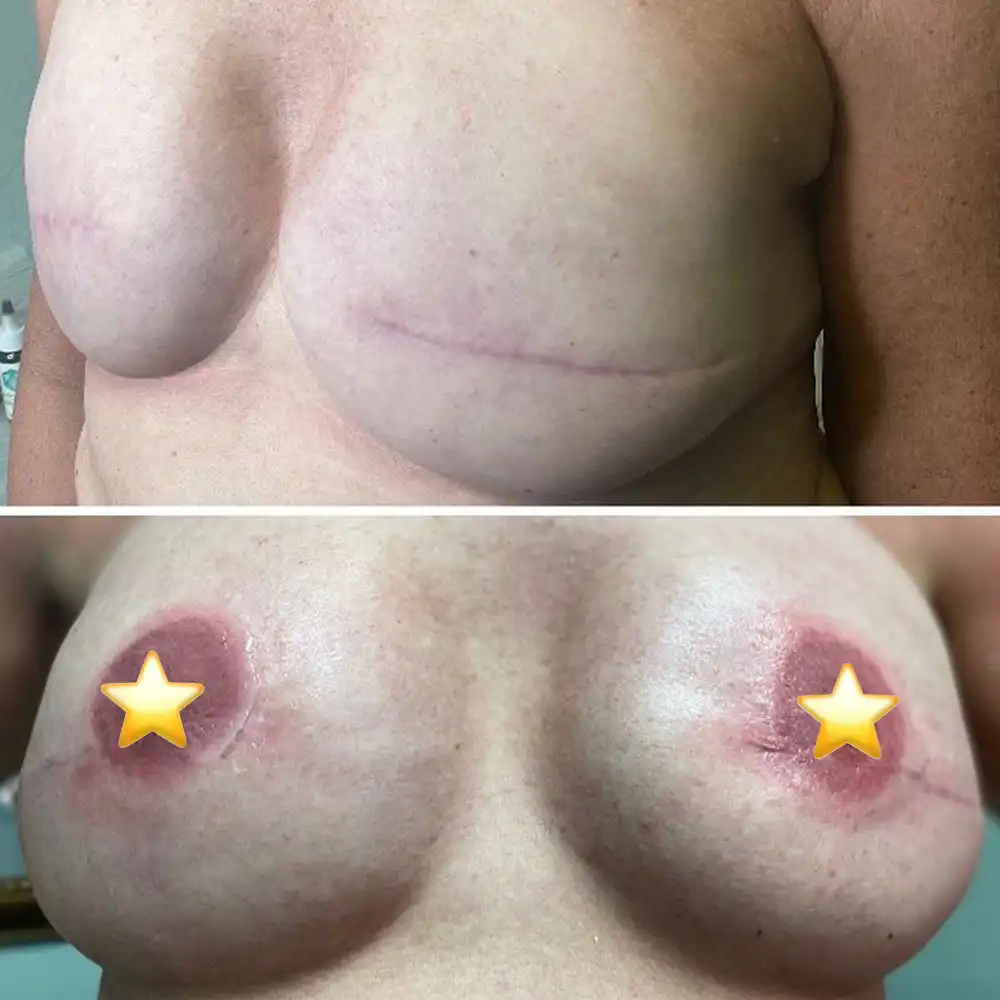
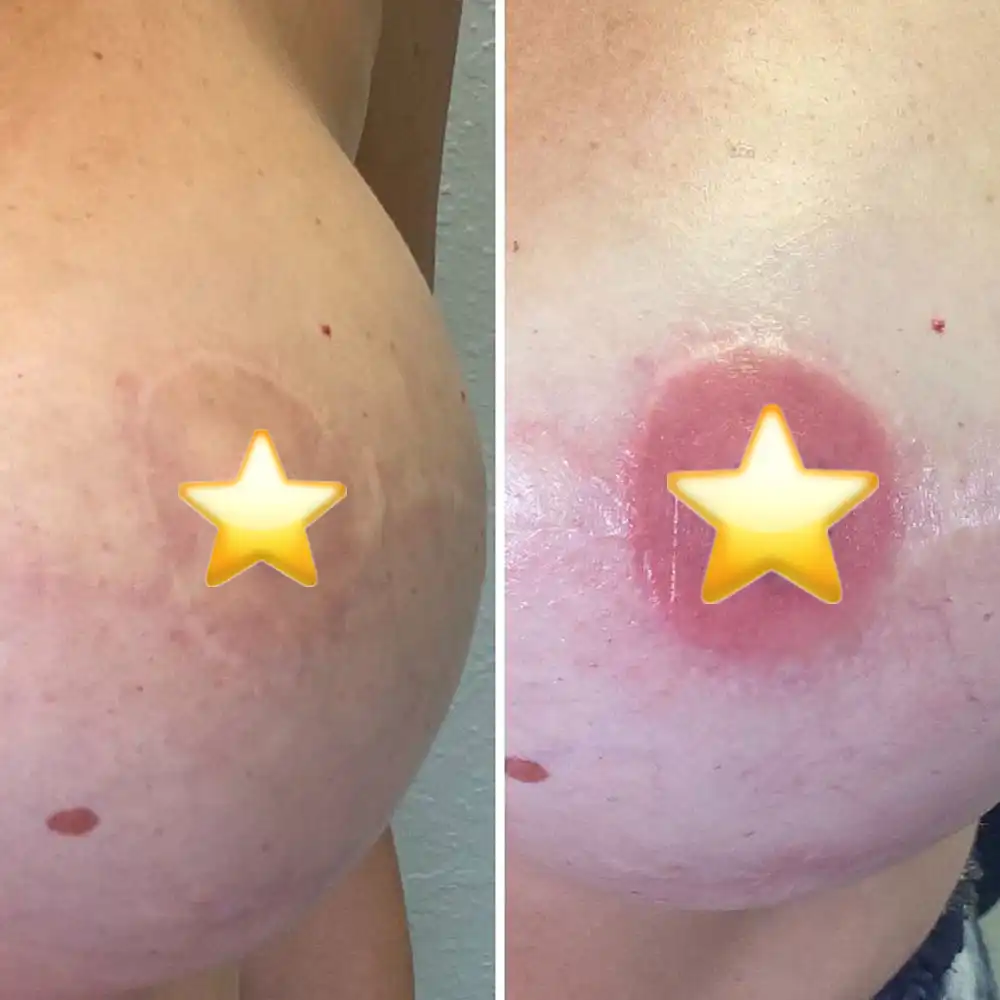
  • It is common for the treated area to appear significantly darker and redder immediately after the procedure. This is a normal response due to the initial trauma to the skin.
  • Over the course of 5-7 days, you will notice the top layer of skin beginning to flake off. This is a natural part of the healing process, revealing the true pigment color beneath, which is typically softer and more natural-looking than the initial appearance.

Daily Care for the First 5 Days:

  • Each day, carefully remove the dressing that covers the treated area. It’s important to discard the old dressing to maintain cleanliness.
  • Using a damp cotton pad, gently cleanse the area to remove any lymph or residue.
  • With a clean cotton bud, apply a fresh layer of Permanent Cosmetic Healing Balm. This balm is specially formulated to aid in the healing process and protect the pigmentation.
  • After applying the balm, cover the area with a new, clean dressing to protect it from external irritants.

Showering and Moisture Precautions for the First Week:

  • It’s crucial to keep the treated area as dry as possible. When showering, apply a thick layer of Vaseline over the areola enhancement to create a waterproof barrier.
  • Limit your time in the shower and opt for cooler water temperatures to reduce steam, which can contribute to moisture buildup.

Activities and Products to Avoid for 2 Weeks:

  • Refrain from using soaps, cleansers, or any harsh chemicals on the treated area.
  • Avoid prolonged exposure to hot water, such as long showers, hot baths, saunas, or Jacuzzis.
  • Stay away from swimming pools and natural bodies of water, as chlorine and salt can adversely affect the healing process.
  • Protect the area from direct sunlight and abstain from using tanning beds or artificial tanning treatments.
  • Do not apply products containing aloe vera, as they can interfere with the healing process.

Signs to Watch For:

  • If you notice any signs of infection, such as extreme redness, swelling, or pus, seek medical attention promptly.

Long-Term Aftercare:

  • To maintain the integrity of the pigmentation, apply a high-quality sunscreen to the treated area whenever exposed to sunlight.
  • If you are considering undergoing chemical peels, MRI scans, or other medical procedures, inform the technician about your micropigmentation enhancement.
  • Following any tattooing procedure, including areola reconstruction, it is recommended to wait at least 4 months before donating blood.
  • If you plan to undergo laser or IPL hair removal treatments, make sure to inform the technician that you have had medical micropigmentation, as these devices can alter the pigment color.

For any concerns or questions regarding the aftercare process, clients of Brows & Lips Permanent Makeup Studio are encouraged to reach out directly for personalized guidance and support.

Semi Permanent Eyebrows Aftercare

permanent makeup proud portfolio

What should I expect immediately after areola reconstruction?

It’s normal for the treated area to appear darker and redder due to the initial trauma to the skin. This will subside as the healing process continues.

How long does it take for the top layer of skin to flake off after the procedure?

The top layer of skin typically begins to flake off within 5-7 days, revealing the true pigment color beneath.

How should I care for the treated area in the first 5 days after areola reconstruction?

Remove and replace the dressing daily, gently cleanse the area with a damp cotton pad, apply Permanent Cosmetic Healing Balm, and cover with a new dressing.

What precautions should I take when showering after areola reconstruction?

Keep the treated area dry by applying a thick layer of Vaseline to create a waterproof barrier. Limit shower time and opt for cooler water to reduce steam.

What activities and products should I avoid for 2 weeks post-procedure?

Avoid using soaps, cleansers, or harsh chemicals on the treated area. Stay away from long hot showers, baths, saunas, Jacuzzis, swimming pools, and direct sunlight. Do not use products containing aloe vera.

What are the signs of infection I should watch for after areola reconstruction?

Be vigilant for signs of infection such as extreme redness, swelling, or pus, and seek medical attention promptly if these occur.

How can I protect the pigmentation long-term?

Apply high-quality sunscreen to the treated area when exposed to sunlight. Inform technicians of your micropigmentation if undergoing chemical peels, MRI scans, or other procedures.

How long should I wait before donating blood after areola reconstruction?

It is recommended to wait at least 4 months after any tattooing procedure, including areola reconstruction, before donating blood.

Should I inform technicians about my areola reconstruction if planning laser or IPL hair removal treatments?

Yes, inform the technician that you have had medical micropigmentation, as laser or IPL treatments can alter the pigment color.

Who should I contact for any concerns or questions regarding the aftercare process?

Clients of Brows & Lips Permanent Makeup Studio should reach out directly for personalized guidance and support regarding the aftercare process.

Permanent Beauty Mark and Freckle Tattoo Aftercare

Beauty Marks and Freckles Healing Process and Aftercare

Table of Contents

The Comprehensive Guide to Beauty Marks and Freckles Healing Process

Understanding the healing process of beauty marks and freckles is essential for those who opt for these cosmetic procedures. In this guide, we delve deep into the day-by-day healing stages, ensuring you’re well-informed and can take the best care of your treated areas.

The Importance of Proper Aftercare

While beauty mark and freckle tattoos are relatively straightforward cosmetic procedures, the post-treatment care is crucial. Proper aftercare ensures not only the longevity of the tattoo but also its appearance and health.

Day-by-Day Healing Process: What to Expect

Day 1: Post-Procedure Reactions

Immediately following the procedure, it’s common for the treated area to exhibit slight swelling and redness. The color will appear significantly darker than expected.

Day 2-3: Initial Healing

During these days, any swelling and redness should begin to subside. The color remains dark, and it’s imperative to keep the area clean. Refrain from using skincare products or makeup directly on the treated spot. A thin layer of healing ointment can be applied to facilitate the healing.

Day 4-7: Scabbing Phase

By the fourth day, the healing process is in full swing. The treated area may start to form scabs. It’s vital not to pick or scratch these scabs as doing so can lead to scarring or potential damage to the tattoo. Keeping the area clean and dry is of utmost importance.

Day 8-14: The Revelation

During this period, the scabs naturally fall off, revealing the skin underneath. It’s not uncommon for the area to appear as if there’s no color. This is a standard part of the healing process. The skin continues to heal and develop its pigment. It’s essential to be patient and allow at least two weeks post-scabbing before evaluating the final tattoo color.

Day 15-20: The Final Outcome

By now, the healing process should be complete, and the beauty mark or freckle tattoo should be fully visible. To ensure the tattoo remains vibrant and lasts longer, avoid prolonged sun exposure. When the treated area is exposed to the sun, always use a broad-spectrum sunscreen with an SPF of at least 30.

Activities to Avoid During the Healing Process

  • Sun Exposure: Direct sunlight can fade the tattoo.
  • Make-up: Avoid applying makeup on the treated area to prevent infections.
  • Skincare Products: Some products might interfere with the healing.
  • Face Peels: These can cause the permanent makeup to lighten.
  • Swimming: Chlorinated water can affect the tattoo’s color.
  • Scratching or Picking: This can damage the tattoo and cause scarring.

In Conclusion

Beauty marks and freckle tattoos can enhance one’s natural beauty. However, understanding and following the healing process ensures the best possible outcome. By adhering to the aftercare guidelines and being patient, you can enjoy your beauty marks and freckles for a long time.

Semi Permanent Eyebrows Aftercare

permanent makeup proud portfolio

Why is aftercare important for beauty mark and freckle tattoos?

Post-treatment care is crucial for the appearance and longevity of beauty mark and freckle tattoos.

What reactions can be expected immediately after the procedure?

Immediately after the procedure, the treated area may show swelling, redness, and a darker color than anticipated.

How long does the scabbing phase last?

The scabbing phase typically occurs from days 4 to 7 post-procedure.

When will the final tattoo color be visible?

By day 20, the tattoo should be fully visible with its final color.

Can I apply makeup on the treated area immediately?

No, it’s recommended to avoid applying makeup on the treated area during the initial healing phase to prevent infections.

Is sun exposure harmful for the healing tattoo?

Yes, direct sunlight can fade the tattoo. It’s advisable to use sunscreen when exposed to the sun.

What happens between days 8 to 14?

Between days 8 to 14, scabs naturally fall off, revealing the skin underneath.

Can skincare products interfere with the healing?

Yes, some skincare products might interfere with the healing process of the tattoo.

Is it harmful to pick or scratch the scabs?

Yes, picking or scratching the scabs can damage the tattoo and lead to scarring.

How can I ensure the longevity of my beauty mark or freckle tattoo?

Adhering to the aftercare guidelines, avoiding direct sun exposure, and being patient during the healing process can ensure the longevity of the tattoo.

Scar Camouflage Aftercare

Scar Camouflage Aftercare

Table of Contents

Comprehensive Guide to Scar Camouflage Aftercare

Introduction

Scar camouflage is a revolutionary technique that uses micropigmentation to blend scars with the surrounding skin. As with any cosmetic procedure, proper aftercare is crucial to achieve the best results and ensure the longevity of the treatment. In this guide, we’ll delve deep into the aftercare procedures to ensure optimal results.

Importance of Aftercare

After undergoing a scar camouflage treatment, the skin needs time to heal and accept the newly introduced pigments. Proper aftercare ensures:

  • Faster healing of the treated area.
  • Prevention of infections.
  • Retention of the pigment in the skin.
  • Achieving a natural and seamless blend with the surrounding skin.

Immediate Aftercare: First 72 Hours

1. Protect the Treated Area

  • Keep the area covered: For the first three days, it’s essential to keep the treated area covered with a sterile bandage or dressing. This protects the skin from external contaminants and reduces the risk of infections.
  • Avoid direct sunlight: Sun exposure can cause the pigments to fade prematurely. Ensure you protect the treated area from direct sunlight by wearing protective clothing or using an umbrella.

2. Keep the Area Clean

  • Gentle cleansing: Clean the area with lukewarm water and a mild soap. Avoid scrubbing or using harsh cleansers.
  • Pat dry: After cleansing, gently pat the area dry with a soft towel. Avoid rubbing or applying pressure.

3. Moisturize Regularly

  • Use a recommended ointment: Apply a thin layer of the recommended ointment or moisturizer to keep the skin hydrated. This aids in the healing process and prevents scabbing.

Long-Term Aftercare: Beyond the First Week

1. Avoid Swimming and Saunas

  • Stay away from chlorinated water: Chlorine can bleach the pigments and alter the color of the camouflage. Avoid swimming pools for at least two weeks post-treatment.
  • Avoid saunas and steam rooms: Excessive sweating can cause the pigments to fade. It’s best to avoid saunas and steam rooms for a few weeks.

2. Limit Physical Activities

  • Avoid strenuous exercises: Sweating can affect the healing process. Limit physical activities for the first week to ensure the pigments settle well.

3. No Picking or Scratching

  • Let the skin heal naturally: Picking or scratching the treated area can lead to scarring and uneven pigment distribution. Allow any scabs or dry skin to fall off naturally.

Conclusion

Proper aftercare is the key to achieving the best results from scar camouflage treatments. By following the guidelines mentioned above, you can ensure a smooth healing process and enjoy long-lasting results. Always consult with your technician or dermatologist if you have any concerns or questions about the aftercare process.

Semi Permanent Eyebrows Aftercare

permanent makeup proud portfolio

What is the primary purpose of scar camouflage?

Scar camouflage uses micropigmentation to blend scars with the surrounding skin, offering a more uniform appearance.

How should I care for my skin immediately after the treatment?

For the first three days, protect the treated area from sunlight, keep it clean, and moisturize with a recommended ointment.

Why is moisturization important after scar camouflage?

Moisturization aids in the healing process, keeps the skin hydrated, and prevents scabbing, ensuring the longevity of the treatment.

What activities should I avoid post-treatment?

Avoid swimming in chlorinated water, using saunas, and engaging in strenuous exercises for the first week after treatment.

Can I pick or scratch the treated area?

No, picking or scratching can lead to scarring and uneven pigment distribution. Let any scabs fall off naturally.

Why should I avoid direct sunlight on the treated area?

Direct sunlight can cause the pigments to fade prematurely, altering the results of the camouflage.

How does chlorine affect the treated area?

Chlorine can bleach the pigments, potentially altering the color of the camouflage, so it’s best to avoid swimming pools for at least two weeks post-treatment.

How long should I limit physical activities after the treatment?

It’s recommended to limit strenuous exercises for the first week post-treatment to ensure the pigments settle well.

Can I use any ointment for moisturization?

It’s best to use the ointment recommended by your technician to ensure proper hydration and healing without adverse reactions.

Why is aftercare crucial for scar camouflage?

Proper aftercare ensures faster healing, prevention of infections, pigment retention, and a natural blend with the surrounding skin.

Permanent Cheek Blush Aftercare

Permanent Cheek Blush Aftercare

Table of Contents

Permanent Cheek Blush Aftercare Guide

Permanent cheek blush, often referred to as blush tattooing or semi-permanent blush, is a popular cosmetic enhancement. Ensuring proper aftercare is essential for the best results and longevity of the blush. This guide provides comprehensive steps for optimal permanent cheek blush aftercare.

Immediate Aftercare Tips

Hands Off!

  • For the first few hours, resist touching the treated area to prevent bacterial contamination.
  • Always ensure your hands are clean before touching your face.

Gentle Cleansing Ritual

  • Use a mild, fragrance-free cleanser to clean the blushed area.
  • Remember to pat dry with a soft cloth, avoiding any rubbing.

Maintaining Your Permanent Blush

Moisturizing is Key

  • Use the aftercare ointment given by your technician.
  • If none is provided, opt for a gentle, fragrance-free moisturizer.
  • Products with acids, retinoids, or strong ingredients should be avoided.

Sun Protection

  • The freshly treated area is sun-sensitive. Direct sun exposure should be avoided for at least a week.
  • To prevent premature fading of the pigment, always apply sunscreen once healed.

Makeup and Permanent Blush

  • Refrain from applying makeup on the treated area for a minimum of one week. This ensures proper healing and prevents potential infections.

Activities to Avoid

Sweat and Permanent Blush

  • Intense workouts or sweat-inducing activities should be avoided for at least 48 hours post-procedure.

Swimming Post-Procedure

  • Pools, saunas, hot tubs, or any water bodies are off-limits for a week to prevent infections.

Exfoliation Alert

  • The treated area should not be exfoliated for at least two weeks to maintain the blush’s vibrancy.

Healing and Recovery

What to Expect

  • Mild redness, swelling, and tenderness are normal post-procedure reactions. These should diminish within a few days.
  • For severe reactions or signs of infection, immediately consult your technician or a medical professional.

The Importance of Follow-ups

  • Scheduled follow-up visits are crucial. They allow the technician to assess the healing and make necessary touch-ups.

Resist Picking or Scratching

  • The healing area may flake or peel. Avoid picking or scratching to prevent scars and uneven pigment.

By adhering to this permanent cheek blush aftercare guide, you can ensure a smooth healing process and enjoy long-lasting, radiant results.

Semi Permanent Eyebrows Aftercare

permanent makeup proud portfolio

What should I avoid touching after the permanent cheek blush procedure?

Avoid touching the treated area for the first few hours to prevent bacterial contamination.

How should I cleanse my face post-procedure?

Use a mild, fragrance-free cleanser and pat dry gently without rubbing.

How long should I avoid makeup after the treatment?

Refrain from applying makeup on the treated area for at least one week.

Are there any activities I should avoid post-procedure?

Yes, avoid intense workouts, swimming, and exfoliating the treated area for specified durations.

What can I expect in terms of healing?

Expect mild redness, swelling, and tenderness which should diminish within a few days.

How important are follow-up visits?

Scheduled follow-up visits are crucial for assessing healing and making necessary touch-ups.

Should I be concerned about sun exposure?

Yes, the treated area is sun-sensitive. Avoid direct sun exposure for at least a week and apply sunscreen once healed.

Can I exfoliate my face after the procedure?

Avoid exfoliating the treated area for at least two weeks to maintain the blush’s vibrancy.

What type of moisturizer should I use post-treatment?

Use the aftercare ointment provided by your technician or a gentle, fragrance-free moisturizer.

How can I prevent scars or uneven pigment?

Resist the urge to pick or scratch the healing area to prevent scars and uneven pigment distribution.

permanent eyeliner aftercare guide

Comprehensive Guide to Semi-Permanent Eyeliner Aftercare

Table of Contents

Comprehensive Guide to Semi-Permanent Eyeliner Aftercare

Ensuring the longevity and vibrancy of your semi-permanent eyeliner procedure is paramount. Proper aftercare is the key to achieving the best results. Here’s a detailed guide to help you through the process.

Precare Recommendations

1. Dietary Precautions

Consume a meal before your appointment to maintain stable blood sugar levels.

2. Alcohol and Caffeine

Refrain from excessive alcohol or caffeine 24 hours before the procedure. They can thin the blood, leading to increased sensitivity and potential bruising.

3. Sun Exposure

Avoid sun tanning for at least a week before the procedure.

4. Medications

Steer clear of blood-thinning medications 24 hours prior. This includes Aspirin, Niacin, Vitamin E, Advil/Ibuprofen, and fish oil tablets. Always consult with your physician regarding any medication concerns.

5. Eyelash Care

Eyelash extensions should be removed at least 3 days before the procedure. Avoid eyelash perms or tinting 3 days prior. If using eyelash growth serums like Latisse, discontinue use 3-6 months before treatment.

6. Cosmetic Procedures

Discontinue Retin-A one week prior. Avoid Botox around the eyes 2 weeks before the procedure.

7. Day of the Procedure

Come in without any eye makeup. If you wear contact lenses, opt for glasses instead.

Post Procedure Care (Day 1-7)

1. Immediate Aftercare

Rinse your eyes with water to remove any pigment residue right after the procedure. Gently pat dry with a clean tissue.

2. Cleaning

Cleanse the skin around the eyes twice daily using a gentle, unscented soap. Pat dry gently.

3. Ointment Application

For thick eyeliner, apply ointment 2-3 times a day for up to 7 days. This step can be skipped for lashline enhancements.

4. Scabbing

Scabs will form and take about 7-10 days to peel off. Avoid picking at them or peeling them prematurely.

5. Color Fading

The color will fade approximately 30-50% once the scabs fall off. This is a normal part of the healing process.

6. Makeup and Activities

Refrain from using eye makeup until the scabs have completely fallen off. Avoid activities that induce sweating, such as hot saunas, hot yoga, and swimming.

7. Scab Care

If scabs form on the lashes, ensure they are soft before attempting to remove them. A mascara brush can aid in this process.

8. Swelling Management

Active blinking for 2 minutes in the morning can help reduce swelling. Soft gel ice packs can also be used to alleviate swelling.

For any concerns or questions, always consult with a professional. Proper aftercare ensures the longevity and vibrancy of your semi-permanent eyeliner, making the entire process worthwhile.

Semi Permanent Eyebrows Aftercare

permanent makeup proud portfolio

What should I eat before my semi-permanent eyeliner procedure?

It’s recommended to consume a meal before your appointment to maintain stable blood sugar levels.

How should I prepare regarding alcohol and caffeine?

Refrain from excessive alcohol or caffeine 24 hours before the procedure to prevent thinning of the blood.

What medications should I avoid before the procedure?

Avoid blood-thinning medications 24 hours prior, including Aspirin, Niacin, Vitamin E, and Advil/Ibuprofen.

How should I care for my eyelashes before the procedure?

Eyelash extensions should be removed 3 days prior, and eyelash perms or tinting should be avoided 3 days before the procedure.

Are there any cosmetic procedures to avoid?

Yes, discontinue Retin-A one week prior and avoid Botox around the eyes 2 weeks before the procedure.

How should I care for my eyes immediately after the procedure?

Rinse your eyes with water to remove any pigment residue and pat dry gently with a clean tissue.

How often should I clean the skin around my eyes post-procedure?

Cleanse the skin around the eyes twice daily using a gentle, unscented soap.

What should I expect regarding scabbing?

Scabs will form and take about 7-10 days to peel off. It’s crucial to avoid picking at them or peeling them prematurely.

Will the color of the eyeliner fade after the procedure?

Yes, the color will fade approximately 30-50% once the scabs fall off, which is a normal part of the healing process.

How can I manage swelling after the procedure?

Active blinking for 2 minutes in the morning can help reduce swelling. Soft gel ice packs can also be used to alleviate swelling.

scalp-micropigmentation-smp-aftercare dubai

Scalp Micropigmentation Aftercare

Table of Contents

Comprehensive Guide to Scalp Micropigmentation Aftercare

Scalp Micropigmentation (SMP) is a revolutionary procedure that offers a solution for people experiencing hair loss. However, like all cosmetic procedures, the results are significantly influenced by how well you care for the treated area afterward. Here’s a detailed guide to ensure the longevity and vibrancy of your SMP treatment.

Immediate Aftercare: The First 4 Days

  • Days 1-3: It’s crucial to let your scalp heal. Refrain from washing your head or engaging in activities that induce sweating, such as gym workouts or visits to saunas and beaches.
  • Day 4: You can start washing your scalp using only water. Begin the moisturizing routine to prepare your scalp for the next session.

Daily Care for the First Week

  • Cleansing: Use a gentle facial cleanser to keep the treated area clean.
  • Moisturizing: Ensure your scalp remains hydrated daily. A well-moisturized scalp can significantly enhance the appearance of the pigmentation.

Activities to Avoid for the First Month

  • Sun Exposure: Direct exposure to the sun can fade the pigmentation. Always use proper sun protection for your scalp.
  • Swimming & Saunas: Stay away from chlorinated pools, salt water, and saunas. These can interfere with the healing process and affect the pigment’s appearance.
  • Excessive Sweating: Activities that cause heavy sweating should be avoided. Sweating can lead to the secretion of salts, which can fade the pigmentation.

Long-Term Care Guidelines

  • Sun Protection: Always protect your scalp from direct sunlight to maintain the vibrancy of the pigmentation.
  • Avoid Alcohol-Based Products: Cosmetics and products with high alcohol content can fade the pigmentation. Opt for alcohol-free alternatives.
  • Exfoliation: Use an exfoliating cleanser regularly to keep your scalp in top condition.
  • MRI Scans: If you’re considering an MRI scan, inform your doctor about your SMP treatment.
  • Blood Donation: Inform the National Blood Service about your treatment, as there might be a waiting period before you can donate.

In conclusion, proper aftercare is paramount to achieving the best results from your Scalp Micropigmentation treatment. By following these guidelines, you can enjoy the benefits of your treatment for years to come.

Semi Permanent Eyebrows Aftercare

permanent makeup proud portfolio

What is the immediate aftercare for Scalp Micropigmentation?

For the first three days post-treatment, avoid washing the scalp and activities that induce sweating. By day four, you can gently wash with water and start moisturizing.

What is the recommended daily care routine during the first week?

During the initial week, cleanse the treated area with a gentle facial cleanser and maintain daily hydration to enhance the pigmentation’s appearance.

Which activities should be avoided after the treatment?

For the first month, protect the scalp from direct sunlight, avoid swimming in chlorinated pools and saunas, and refrain from activities causing excessive sweating.

How should I care for my scalp in the long term?

Always use sun protection, opt for alcohol-free cosmetic products, exfoliate regularly, and inform medical professionals about your SMP treatment when necessary.

Can I use any facial cleanser on the treated area?

It’s recommended to use a gentle facial cleanser to keep the treated area clean without causing irritation.

Is sweating harmful after the treatment?

Yes, excessive sweating can lead to the secretion of salts which can fade the pigmentation. It’s best to avoid heavy sweating activities for the first month.

Why should I avoid alcohol-based products?

Cosmetics and products with high alcohol content can fade the pigmentation. It’s best to opt for alcohol-free alternatives.

How often should I exfoliate my scalp?

Regular exfoliation is recommended to keep your scalp in top condition. However, the frequency can vary based on individual skin types and needs.

Do I need to inform my doctor about the SMP treatment before an MRI scan?

Yes, if you’re considering an MRI scan, it’s essential to inform your doctor about your Scalp Micropigmentation treatment.

Can I donate blood after the SMP treatment?

You should inform the National Blood Service about your treatment, as there might be a waiting period before you can donate.

facials-after-microblading

Facials After Microblading: Comprehensive Guide on Dos and Don’ts

Table of Contents

Facials After Microblading: Comprehensive Guide on Dos and Don’ts

Microblading has emerged as a revolutionary semi-permanent makeup technique, offering individuals the luxury of perfectly shaped eyebrows without the daily hassle of filling them in. However, post-procedure care is crucial to ensure the longevity and vibrancy of the results. One of the common concerns is the compatibility of facials with freshly microbladed eyebrows. In this guide, we delve deep into the intricacies of facials post-microblading, highlighting what you should embrace and what you should steer clear of.

The Healing Process: Understanding the Timeline

Before diving into the specifics of facials, it’s essential to comprehend the healing timeline of microbladed eyebrows.

  • Days 1-4: The eyebrows appear darker and more defined. Minor redness and swelling are normal.
  • Days 5-7: The eyebrows start to itch and will begin to lightly scab over.
  • Days 8-10: Scabs start to flake off, revealing lighter and softer brows underneath.
  • Days 11-28: The color of the brows stabilizes, and the final results become evident.

Facials to Embrace Post-Microblading

Gentle Cleansing

A mild facial cleanser can be used after the first week. Ensure that the product is free from alcohols, acids, and exfoliants. Gently cleanse the face, avoiding direct contact with the eyebrows.

Hydrating Masks

After the initial healing phase (approximately 10 days), you can indulge in hydrating masks. These masks nourish the skin and don’t interfere with the microblading pigment.

Facials to Avoid Post-Microblading

Chemical Peels

Chemical peels involve the use of acids that can potentially fade the microblading pigment. It’s advisable to wait at least a month before considering this treatment.

Microdermabrasion

This exfoliating treatment can be abrasive on freshly microbladed eyebrows. Hold off on microdermabrasion for at least four weeks post-microblading.

Steam and Sauna

The heat and moisture from steam rooms and saunas can hinder the healing process. It’s best to avoid these for the first two weeks.

Conclusion

Microblading is a delicate procedure, and the post-care regimen plays a pivotal role in achieving the desired results. By understanding the healing timeline and being discerning about facial treatments, you can ensure that your eyebrows remain in pristine condition. Always consult with your microblading technician for personalized advice tailored to your specific needs.

Semi Permanent Eyebrows Aftercare

permanent makeup proud portfolio


What is microblading?

Microblading is a revolutionary semi-permanent makeup technique that offers individuals perfectly shaped eyebrows without the daily hassle of filling them in.

How long does the healing process for microblading take?

The healing process for microbladed eyebrows typically takes between 11 to 28 days for the color to stabilize and final results to become evident.

Can I use a facial cleanser after microblading?

Yes, a mild facial cleanser can be used after the first week, ensuring it’s free from alcohols, acids, and exfoliants.

Are hydrating masks safe post-microblading?

Yes, after the initial healing phase (approximately 10 days), hydrating masks can be used as they nourish the skin without interfering with the microblading pigment.

Should I avoid chemical peels after microblading?

Yes, it’s advisable to wait at least a month before considering chemical peels as they can potentially fade the microblading pigment.

Is microdermabrasion safe after microblading?

No, it’s recommended to hold off on microdermabrasion for at least four weeks post-microblading as it can be abrasive on freshly microbladed eyebrows.

Can I visit steam rooms or saunas after microblading?

It’s best to avoid steam rooms and saunas for the first two weeks post-microblading as the heat and moisture can hinder the healing process.

How do freshly microbladed eyebrows appear in the first few days?

In the first few days post-microblading, the eyebrows appear darker and more defined with minor redness and swelling.

When do microbladed eyebrows start to scab?

Microbladed eyebrows start to itch and begin to lightly scab over between days 5 to 7 post-procedure.

Should I consult with my microblading technician for post-care?

Yes, always consult with your microblading technician for personalized advice tailored to your specific needs.


constellation-freckle-tattoos

Constellation Freckle Tattoos: The Celestial Beauty Trend

Table of Contents

Constellation Freckle Tattoos: The Celestial Beauty Trend

Introduction: The Rise of Astro Freckles

In recent years, the beauty industry has witnessed a surge in the popularity of constellation freckle tattoos, commonly known as “astro freckles.” These tattoos, inspired by the vast expanse of the night sky, are a unique blend of art and astrology, allowing individuals to wear their zodiac signs and celestial patterns with pride.

The Allure of Constellation Tattoos

A Personal Connection to the Cosmos

Astro freckles offer a deep, personal connection to the cosmos. For many, the stars and planets hold significant meaning, often guiding life choices, personalities, and destinies. By getting a constellation tattoo, individuals can carry a piece of the universe with them, symbolizing their unique place in the vast cosmic tapestry.

A Timeless Beauty Trend

While beauty trends come and go, the allure of the stars remains timeless. Constellation freckle tattoos, with their delicate and intricate designs, add a touch of elegance and sophistication, making them a perennial favorite among beauty enthusiasts.

The Process of Getting Astro Freckles

Choosing the Right Design

The first step in getting astro freckles is selecting the right design. Whether it’s the constellation of one’s zodiac sign, a favorite celestial body, or a unique star pattern, the possibilities are endless. It’s essential to choose a design that resonates personally and holds special significance.

The Tattooing Procedure

Once the design is finalized, the next step is the tattooing procedure. Using specialized equipment, the artist carefully inks the chosen constellation pattern onto the skin. The process is meticulous, ensuring that each freckle is perfectly placed to create a stunning celestial masterpiece.

Caring for Your Constellation Tattoo

Immediate Aftercare

After getting the tattoo, it’s crucial to follow the artist’s aftercare instructions. This usually involves keeping the tattooed area clean, avoiding direct sunlight, and refraining from picking or scratching the tattoo.

Long-term Maintenance

To ensure that the astro freckles remain vibrant and clear, regular moisturizing and protection from UV rays are essential. Using a high SPF sunscreen can help prevent fading and keep the tattoo looking fresh for years to come.

The Future of Astro Freckles

With the continued fascination with the cosmos and the desire for unique beauty trends, the popularity of constellation freckle tattoos shows no signs of waning. As more individuals seek to express their cosmic connection, astro freckles will undoubtedly remain a sought-after beauty trend for the foreseeable future.

Conclusion

Constellation freckle tattoos, or astro freckles, are more than just a beauty trend. They are a celebration of one’s connection to the universe, a testament to the timeless allure of the stars. As individuals continue to seek unique ways to express themselves, astro freckles will remain a shining example of the perfect blend of art, beauty, and cosmic wonder.

Semi Permanent Eyebrows Aftercare

permanent makeup proud portfolio

What are constellation freckle tattoos?

Constellation freckle tattoos, also known as “astro freckles,” are tattoos inspired by the night sky, representing zodiac signs and celestial patterns.

Why are astro freckles popular?

Astro freckles offer a personal connection to the cosmos and are a timeless beauty trend, blending elegance and sophistication.

How do I choose the right design for my constellation tattoo?

Choose a design that resonates personally, whether it’s your zodiac sign, a favorite celestial body, or a unique star pattern.

How is the tattooing procedure done?

Using specialized equipment, the artist inks the chosen constellation pattern onto the skin, ensuring each freckle is perfectly placed.

How do I care for my tattoo immediately after getting it?

Follow the artist’s aftercare instructions, which usually involve keeping the area clean, avoiding sunlight, and not picking or scratching the tattoo.

How can I maintain the vibrancy of my astro freckles in the long term?

Regularly moisturize and protect the tattoo from UV rays using a high SPF sunscreen to prevent fading.

Will the popularity of astro freckles fade soon?

Given the continued fascination with the cosmos and unique beauty trends, astro freckles are expected to remain popular for the foreseeable future.

Are constellation tattoos just a beauty trend?

No, they are more than a trend. They symbolize one’s connection to the universe and the timeless allure of the stars.

Can I get a constellation tattoo even if I don’t believe in astrology?

Absolutely! While many choose designs based on astrology, others opt for astro freckles purely for their aesthetic appeal and personal significance.

How long does it take for a constellation tattoo to heal?

Healing times can vary, but typically, it takes a few weeks for the skin to fully heal. Always follow the aftercare instructions provided by the tattoo artist.

Comprehensive Insights into PMU Eyeliner Mapping

Table of Contents

Comprehensive Insights into PMU Eyeliner Mapping

PMU eyeliner is a transformative cosmetic procedure that offers a lasting solution for those seeking defined and captivating eyes without the daily hassle of makeup application. The key to achieving impeccable results lies in mastering the art of eyeliner mapping. In this detailed guide, we delve deep into the intricacies of PMU eyeliner mapping, its significance, techniques, and expert tips to ensure perfection.

Understanding PMU Eyeliner Mapping

PMU eyeliner mapping, often referred to as pre-draw, is the meticulous process of sketching a precise outline of the desired eyeliner shape prior to the application of permanent makeup. This step is paramount as it sets the foundation for the entire procedure.

The objective of eyeliner mapping is to design a shape that accentuates the client’s eye structure and facial aesthetics. Proper mapping not only ensures a harmonious look but also significantly reduces the likelihood of errors during the tattooing phase.

Why Eyeliner Mapping is Crucial

1. Achieving Perfect Symmetry

  • Our facial features are inherently asymmetrical. This means our eyes might differ slightly in size or shape. Eyeliner mapping is the tool that helps bridge this asymmetry, ensuring that both eyes showcase a balanced and harmonious design.

2. Tailoring a Custom Look

  • Every individual has unique preferences and eye structures. Eyeliner mapping facilitates the creation of a design tailored to the client’s desires, be it a subtle lash enhancement or a dramatic statement.

3. Ensuring Precision in Application

  • Given that PMU eyeliner is essentially a cosmetic tattoo, rectifying any post-application discrepancies can be challenging. Mapping acts as a blueprint, guiding the artist and minimizing potential errors.

Techniques for PMU Eyeliner Mapping

Freehand Pre-Draw Technique

For understated eyeliner styles, many professionals prefer the freehand pre-draw method. This technique offers flexibility and is particularly favored for its adaptability.

To execute this method:

  1. Start with a high-quality mapping pencil on a clean canvas.
  2. Initiate from the eye’s outer corner, sketching a fine line along the upper lash line.
  3. Follow the eyelid’s natural curve, ensuring a smooth trajectory.
  4. For winged styles, begin by shaping the wing, aligning it with the lower waterline, and then connecting it to the eye’s inner corner.

String PMU Eyeliner Mapping

This technique employs an inked mapping string to delineate the desired eyeliner shape.

To employ this method:

  1. Measure the distance between the eyes’ inner and outer corners.
  2. Position the string from the inner corner towards the eyebrow’s start, maintaining a 90-degree angle.
  3. Gently press the string along the upper lash line, tracing the eyelid’s contour.
  4. For winged designs, extend the string from the eye’s outer corner, shaping the wing as per the client’s preference.

Expert Tips for Flawless PMU Eyeliner Mapping

  • Precision is Key: Always work in fine strokes, gradually building the design. This approach makes corrections simpler.
  • Symmetry Check: After mapping, have the client sit up and use tools like calipers to ensure both eyes mirror each other perfectly.
  • Consider Aging: As we age, our skin sags. Ensure the wing remains within the natural eye crease to prevent it from drooping over time.
  • Camouflaging Fine Lines: For mature clients, a shaded eyeliner look can mask fine lines on the eyelids. Opt for a short, angled wing to impart a lifted appearance.

In Summary

Eyeliner mapping is the cornerstone of the PMU eyeliner application. It guarantees symmetry, precision, and a design tailored to each client. Whether using a pre-inked mapping string or freehand drawing, practice and open dialogue with clients are pivotal to crafting the ideal PMU eyeliner look.

Semi Permanent Eyebrows Aftercare

permanent makeup proud portfolio

What is PMU eyeliner mapping?

PMU eyeliner mapping, often referred to as pre-draw, is the meticulous process of sketching a precise outline of the desired eyeliner shape prior to the application of permanent makeup.

Why is eyeliner mapping crucial?

Eyeliner mapping ensures perfect symmetry, tailors a custom look to individual preferences, and ensures precision in the PMU eyeliner application.

What techniques are used for PMU eyeliner mapping?

The two primary techniques are the Freehand Pre-Draw Technique and the String PMU Eyeliner Mapping.

How does the Freehand Pre-Draw Technique work?

This method involves using a high-quality mapping pencil to sketch the desired eyeliner design on a clean canvas, following the eyelid’s natural curve.

How is the String PMU Eyeliner Mapping technique executed?

This technique employs an inked mapping string to delineate the desired eyeliner shape, tracing the eyelid’s contour and shaping the wing as per preference.

Why is precision important in PMU eyeliner mapping?

Precision ensures that the design is built gradually with fine strokes, making corrections simpler and resulting in a flawless look.

How can one ensure symmetry in PMU eyeliner mapping?

After mapping, it’s recommended to have the client sit up and use tools like calipers to ensure both eyes mirror each other perfectly.

What considerations should be made for aging clients?

For aging clients, it’s important to ensure the wing remains within the natural eye crease to prevent it from drooping over time. Additionally, a shaded eyeliner look can mask fine lines on the eyelids.

How can PMU eyeliner mapping camouflage fine lines?

For mature clients, a shaded eyeliner look can mask fine lines on the eyelids. Opting for a short, angled wing can also impart a lifted appearance.

What is the cornerstone of the PMU eyeliner application?

Eyeliner mapping is the cornerstone of the PMU eyeliner application as it guarantees symmetry, precision, and a design tailored to each client.

microblading-without-numbing-cream

Microblading Without Numbing Cream: A Comprehensive Guide

Table of Contents

Microblading Without Numbing Cream: A Comprehensive Guide

Microblading is a semi-permanent makeup procedure that has gained immense popularity in recent years. While the procedure itself is relatively straightforward, the decision to use or skip numbing cream can significantly impact the experience and results. In this article, we delve deep into the pros and cons of microblading without numbing cream, providing you with a holistic understanding to make an informed choice.

Advantages of Microblading Without Numbing Cream

1. Enhanced Control Over Depth

Microblading without numbing cream allows artists to have better control over the depth of their strokes. Softened skin, due to numbing creams, can make it challenging to determine the pressure applied. By avoiding numbing creams initially, artists can achieve more natural-looking outcomes.

2. Reduced Allergic Reaction Risk

While numbing creams are generally considered safe, there’s a slight risk of allergic reactions, especially for clients with sensitive skin. By forgoing numbing creams, artists can offer a safer experience, albeit with some discomfort.

3. Simplified Compliance with State Laws

In the US, the use of numbing cream for permanent makeup varies by state. Most states stipulate that numbing creams should not contain more than one numbing agent and that the agent’s percentage should not exceed 5%. By avoiding numbing creams, artists can easily adhere to these regulations.

4. Quicker Procedures

Numbing creams can take up to 30 minutes to take effect, prolonging the microblading procedure. Some artists prefer to skip numbing cream to save time.

5. Improved Client Communication

Effective communication between the artist and client is vital. Some artists believe that slight discomfort during the procedure without numbing cream facilitates better feedback from clients regarding pressure and sensation.

How Numbing Cream Influences Microblading Results

Numbing creams, particularly primary anesthetics, can alter the skin’s texture, impacting pigment retention and the final appearance of the brows. These anesthetics can make the skin feel overly moist, which isn’t ideal for microblading. The skin should remain crisp and taut but not overly dry.

Addressing Pain Concerns

If clients find the discomfort unbearable, artists can use secondary numbing products suitable for broken skin. These products are typically in gel or liquid form, are non-moisturizing, and absorb quickly into the skin.

Potential Drawbacks of Microblading Without Numbing Cream

1. Pain and Discomfort

The most evident downside is the potential discomfort experienced by the client. Pain tolerance varies, and while some clients may not require any numbing, others might find the procedure intolerable without it.

2. Risk of Uneven Application

Clients might involuntarily move or twitch during the procedure without numbing cream, leading to uneven application.

3. Extended Recovery Period

Clients might experience increased redness and swelling post-procedure, extending the recovery period.

Conclusion: Is Microblading Without Numbing Cream Right for You?

Choosing to undergo microblading without numbing cream is a decision that should be made collaboratively between the artist and the client. It’s crucial to weigh the benefits against potential drawbacks, keeping individual pain tolerance in mind.

Note: Always ensure that you comply with local regulations and prioritize client comfort and safety above all else.

Semi Permanent Eyebrows Aftercare

permanent makeup proud portfolio

What is microblading?

Microblading is a semi-permanent makeup procedure that involves creating fine, hair-like strokes on the eyebrows to enhance their appearance.

Why would someone choose microblading without numbing cream?

Choosing microblading without numbing cream can offer enhanced control over depth, reduced risk of allergic reactions, compliance with state laws, quicker procedures, and improved client communication.

How does numbing cream influence microblading results?

Numbing creams, especially primary anesthetics, can alter the skin’s texture, affecting pigment retention and the final appearance of the brows.

What are the drawbacks of microblading without numbing cream?

Potential drawbacks include pain and discomfort, risk of uneven application, and an extended recovery period.

Is microblading without numbing cream suitable for everyone?

The decision should be made collaboratively between the artist and the client, considering individual pain tolerance and desired outcomes.

How can pain concerns be addressed during microblading without numbing cream?

Artists can use secondary numbing products suitable for broken skin to alleviate discomfort during the procedure.

How long does the microblading procedure take without numbing cream?

The procedure might be quicker without the use of numbing cream since there’s no waiting time for the cream to take effect.

Are there any regulations regarding the use of numbing cream for microblading?

In the US, the use of numbing cream for permanent makeup varies by state, with stipulations on the type and percentage of numbing agents used.

What is the risk of allergic reactions with numbing cream?

While numbing creams are generally safe, there’s a slight risk of allergic reactions, especially for clients with sensitive skin.

How can artists ensure the best results in microblading without numbing cream?

Artists should prioritize effective communication with clients, maintain a steady hand, and adhere to best practices and local regulations.

retinol for normal and dark lips dubai

Retinol for Lips: Unveiling the Secrets to Luscious Lips

Table of Contents

Retinol for Lips & Dark Lips: Unveiling the Secrets to Luscious, Even-Toned Lips

Retinol, a cornerstone in the skincare realm, has now ventured into the domain of lip care. But what sets it apart for your lips, especially dark lips? Dive deep into this comprehensive guide that sheds light on retinol’s transformative effects on lips, its myriad benefits, potential risks, and our handpicked list of top products.

Why Retinol is a Game-Changer for Your Lip Care Routine

A derivative of vitamin A, retinol boasts a range of benefits for the lips:

  1. Tackling Lip Pigmentation: Navigate towards a harmonious lip shade as retinol targets hyperpigmentation.
  2. Erasing Fine Lines: Amplify collagen production and diminish those subtle lines framing the lips.
  3. Texture Revamp: Relish the sensation of buttery smooth lips, courtesy of retinol’s exfoliating attributes.

Dark Lips? Here’s How Retinol Can Help

Retinol’s prowess isn’t limited to just enhancing lip texture and reducing fine lines. It’s also a potent ally for those grappling with dark lips:

  • Evening Out the Tone: Retinol aids in lightening dark lips, paving the way for a more balanced lip color.
  • Safety Measures: While retinol can be beneficial for dark lips, it’s crucial to start with a lower concentration and monitor for any adverse reactions.

Navigating the Intricacies of Lip Retinol: Safety Paramount!

While retinol’s benefits are manifold, it’s imperative to exercise caution:

  • Tender Terrain: The skin on the lips is delicate. Begin with a gentler retinol concentration and be on the lookout for any signs of discomfort.
  • Sun Protection: Retinol heightens sun sensitivity. An SPF lip balm is non-negotiable when incorporating retinol.
  • Balance is Essential: Initiate your retinol regimen by applying it a few times weekly, progressively increasing its frequency as your lips acclimatize.

Showcasing Top Lip Retinol Products

Verso Skin Care Moisturizing Lip Serum with Retinol

Melding luxury with efficacy, this lip serum is tailored for all skin types. It synergizes retinol’s potency with hydration, offering a dual benefit for your lips.

Crafting an Optimal Retinol-Infused Lip Care Strategy

To harness retinol’s full potential for your lips:

  1. Gradual Introduction: Incorporate retinol slowly, starting with applications a few nights a week.
  2. Prioritize Hydration: Pair retinol with a moisturizing lip balm to mitigate potential dryness.
  3. Stay in Tune with Your Lips: At any indication of discomfort or redness, take a breather and consider consulting a dermatologist.

In summation, retinol emerges as a formidable tool for those aspiring for plush, radiant, and even-toned lips. By judiciously selecting products and adhering to a thoughtful regimen, you can unlock retinol’s myriad benefits for your lips.

Semi Permanent Eyebrows Aftercare

permanent makeup proud portfolio

What is retinol and its significance for lips?

Retinol is a derivative of vitamin A and is renowned for its skincare benefits. For lips, retinol can tackle pigmentation, erase fine lines, and improve texture, making them appear more youthful and even-toned.

How can retinol help with dark lips?

Retinol aids in lightening dark lips by targeting hyperpigmentation, leading to a more balanced and even lip color.

Are there any precautions to consider when using retinol on lips?

Yes, it’s essential to start with a lower concentration of retinol, always pair it with an SPF lip balm due to increased sun sensitivity, and apply it moderately, beginning a few times a week.

How often should I apply retinol to my lips?

Start by applying retinol a few times a week, and gradually increase its frequency as your lips adjust to it.

What type of lip balm should be used with retinol?

It’s crucial to use an SPF lip balm when incorporating retinol to protect the lips from heightened sun sensitivity.

Can retinol cause irritation on the lips?

Yes, the skin on the lips is delicate, and retinol can cause irritation. It’s essential to monitor for signs of discomfort and consult a dermatologist if needed.

Is retinol suitable for all skin types?

Retinol can be suitable for most skin types, but it’s always recommended to start with a lower concentration and monitor for any adverse reactions, especially on sensitive skin.

How does retinol improve the texture of the lips?

Retinol possesses exfoliating properties that can lead to smoother and softer lips, enhancing their overall texture.

What are the anti-aging benefits of retinol for lips?

Retinol promotes collagen production, which can reduce the appearance of fine lines on and around the lips, giving them a more youthful look.

Can retinol be used daily on the lips?

While retinol can be beneficial, it’s recommended to start by applying it a few times a week and then gradually increasing its use as the lips acclimate to prevent potential irritation.

breast-numbness-and-areola-tattooing

The Comprehensive Guide to Breast Numbness, Nipple Tattoos, and Their Impact.

Table of Contents

The Comprehensive Guide to Breast Numbness, Nipple Tattoos, and Their Impact on Tattooing

Breast numbness is a phenomenon that many individuals experience, especially after undergoing surgical procedures. Understanding its implications, especially when considering tattooing, is crucial. In this guide, we delve deep into the intricacies of breast numbness, its causes, and its effects on tattooing.

Nipple Tattoos: Understanding Breast Numbness

Breast numbness refers to the loss of sensation in the breast area. This can be temporary or permanent, depending on the underlying cause.

Causes of Breast Numbness and Implications for Nipple Tattoos

  1. Surgical Procedures: Mastectomies, breast augmentations, and reductions can lead to numbness due to nerve damage during the procedure.
  2. Trauma: Injuries to the chest or breast area can lead to numbness.
  3. Medical Conditions: Certain conditions, such as diabetes or multiple sclerosis, can result in numbness in various parts of the body, including the breasts.
anatomy-behind-post-surgery-breast-numbness

Nipple Tattoos: The Intersection of Breast Numbness and Tattooing

Tattooing over numb areas presents unique challenges and considerations.

Sensation, Pain Perception, and Nipple Tattoos

While numb areas lack sensation, it doesn’t mean the tattooing process will be pain-free. Surrounding areas might still feel discomfort due to the vibrations and needle movements.

Healing, Aftercare, and Nipple Tattoos

Numb areas might not send the usual signals of discomfort or itching that typically indicate healing. It’s essential to be diligent with aftercare to prevent complications.

Tattoo Precision, Outcome, and Nipple Tattoos

Tattooing on numb skin might feel different for the tattoo artist. Ensuring you choose an experienced artist familiar with tattooing over numb areas is crucial for optimal results.

The Beauty of Nipple Tattoos Post-Surgery

Many individuals choose to get tattoos after mastectomies or other breast surgeries as a form of self-expression, empowerment, or to reclaim their bodies. These tattoos can range from intricate designs to nipple tattoos that recreate the appearance of a natural nipple.

The Rise of Paramedical Tattooing and Nipple Tattoos

Paramedical tattooing is a specialized field where artists use tattooing techniques to camouflage scars, recreate nipples, and more. This form of tattooing can be transformative, helping individuals regain confidence and feel more at home in their bodies.

Semi Permanent Eyebrows Aftercare

permanent makeup proud portfolio

Conclusion

Breast numbness, while challenging, doesn’t have to be a barrier to expressing oneself through tattoos. With the right precautions, knowledge, and an experienced tattoo artist, one can achieve beautiful results that empower and inspire.


What is breast numbness?

Breast numbness refers to the loss of sensation in the breast area, which can be temporary or permanent based on the underlying cause.

Why might someone experience breast numbness after surgery?

Surgical procedures like mastectomies, breast augmentations, and reductions can lead to numbness due to potential nerve damage during the operation.

Are nipple tattoos painful on numb breasts?

While the numb areas lack sensation, the tattooing process might still cause discomfort in the surrounding areas due to vibrations and needle movements.

What precautions should be taken when getting a nipple tattoo on numb skin?

It’s essential to consult with a healthcare provider, choose an experienced tattoo artist, and follow aftercare instructions diligently.

What is paramedical tattooing?

Paramedical tattooing is a specialized field where artists use tattooing techniques to camouflage scars, recreate nipples, and address other medical-related aesthetic concerns.

Why do some individuals opt for nipple tattoos post-surgery?

Many individuals choose nipple tattoos post-surgery as a form of self-expression, empowerment, or to reclaim and beautify their bodies after medical procedures.

How long does it take for a nipple tattoo to heal?

The healing process for a nipple tattoo typically takes a few weeks, but it’s essential to follow the artist’s aftercare instructions for the best results.

Can trauma lead to breast numbness?

Yes, injuries to the chest or breast area can result in numbness due to potential nerve damage or other related issues.

Are there any risks associated with nipple tattoos?

As with any tattoo, there’s a risk of infection, allergic reactions, or unsatisfactory results. It’s crucial to choose a reputable artist and follow aftercare instructions.

How can one ensure the best results for nipple tattoos?

To ensure the best results, always consult with a healthcare provider, choose an experienced and reputable tattoo artist, and diligently follow aftercare instructions.

ombre-brows-on-dark-skin

Ombre Brows on Black Skin: A Comprehensive Guide to Mastery

Table of Contents

Ombre Brows on Black Skin: A Comprehensive Guide to Mastery

Welcome to Brows & Lips Permanent Makeup Studio. As experts in the realm of permanent makeup, we’ve garnered unparalleled experience and insights into ombre brows, especially for black skin. This comprehensive guide elucidates the nuances of this technique, providing intricate details, recommended pigments, and professional tricks.

1. Understanding Ombre Brows

Ombre brows, distinct from traditional tattooed brows, employ a specialized technique producing a soft, shaded look. This method gives the brow a gradient appearance, starting lighter at the front and progressively darkening towards the tail.

Advantages of Ombre Brows for Black Skin

  • Natural Appearance: Ombre brows mimic the natural brow gradient, providing an understated elegance.
  • Durability: These brows retain their charm longer than other methods, reducing frequent touch-ups.
  • Versatility: Suitable for almost all skin types, ombre brows particularly stand out on black skin, accentuating its richness.

2. Best Practices for Ombre Brows on Black Skin

Preliminary Skin Assessment

Every skin is unique. Hence, it’s pivotal to:

  • Determine the skin’s undertone: Warm, cool, or neutral.
  • Evaluate skin oiliness, which can affect pigment retention.

Technique Mastery

Precision is paramount. Key steps include:

  • Beginning with lighter strokes at the brow front.
  • Gradually intensifying pressure towards the tail.
  • Ensuring even distribution of the pigment for uniform shading.

3. Optimal Pigments for Black Skin

Selecting the perfect pigment ensures vibrancy and longevity.

  • Deep Browns: For a subtle yet pronounced look.
  • Charcoal: Ideal for those desiring a bolder appearance.
  • Chocolate Browns: Perfect for those seeking a warm undertone complement.

4. Expert Tricks for Lasting Results

  • Aftercare Regime: Post-procedure, avoid direct sunlight and rigorous activities for at least a week.
  • Moisturizing: Hydrate the brow area with recommended ointments to promote healing and enhance pigment retention.
  • Touch-up Sessions: Periodic touch-ups (typically after 12-18 months) ensure the brows retain their vibrancy.

5. Real-life Examples

Witnessing real-life examples furnishes tangible insights. We proudly showcase numerous clients who’ve reaped the benefits of our expertise, manifesting in exquisitely crafted ombre brows.

6. Diagrammatic Illustration

This simple flowchart illustrates the systematic process we adhere to, ensuring impeccable results every time.

Conclusion

At Brows & Lips Permanent Makeup Studio, our commitment is unwavering. Ombre brows on black skin demand finesse, expertise, and a deep understanding of unique skin characteristics. Trust in our proficiency and be assured of brows that not only enhance your natural beauty but also stand the test of time.

Semi Permanent Eyebrows Aftercare

permanent makeup proud portfolio


FAQs on Ombre Brows for Black Skin by Brows & Lips

What exactly are ombre brows?

Ombre brows use a specialized technique that creates a soft, shaded brow look. It results in a gradient effect, starting lighter at the front and becoming darker towards the tail.

Why are ombre brows suitable for black skin?

Ombre brows provide a natural, long-lasting, and versatile appearance, making them apt for all skin types. On black skin, they accentuate the beauty, complementing its richness and depth.

What considerations are essential before opting for ombre brows on black skin?

It’s crucial to determine the skin’s undertone (be it warm, cool, or neutral) and gauge the level of skin oiliness, as it can influence pigment retention and appearance.

What pigment shades are optimal for black skin?

For black skin, it’s often recommended to go for deep browns, rich charcoal, and sumptuous chocolate brown shades for a harmonious and natural look.

What post-procedure care is advised for ombre brows?

After the procedure, it’s best to avoid direct sun exposure and rigorous activities for a minimum of one week. Keeping the brow area moisturized with recommended ointments is also crucial.

How often should ombre brows be touched-up?

Typically, a touch-up is suggested after 12-18 months to maintain the vibrancy and definition of the brows.

Does Brows & Lips Permanent Makeup Studio showcase real-life examples of their ombre brow work?

Yes, at Brows & Lips Permanent Makeup Studio, there’s a proud display of numerous satisfied clients who have experienced the artistry and precision of our ombre brow services.

What is the mission of Brows & Lips Permanent Makeup Studio when it comes to ombre brows for black skin?

Brows & Lips Permanent Makeup Studio’s unwavering commitment is to deliver top-tier ombre brows for black skin, combining finesse, deep expertise, and an understanding of unique skin nuances.

Why prefer ombre brows over traditional tattooed eyebrows?

Ombre brows offer a more naturally gradient appearance as compared to the often stark and defined traditional tattooed eyebrows. They enhance the natural beauty and impart subtle elegance.

How do ombre brows ensure a gradient and not a blocky appearance?

The technique behind ombre brows is meticulous. It starts with gentle strokes at the brow’s front and gradually intensifies towards the tail. This ensures an even pigment distribution for a seamless shading effect.


best-lip-scrubs-for-dry-lips

Guide to Lip Scrubs: Rejuvenate Your Lips Effectively

Table of Contents

The Ultimate Guide to Lip Scrubs: Rejuvenate Your Lips Effectively

Introduction

In the realm of beauty and skincare, it’s undeniable that our lips play a pivotal role. Soft, supple lips can elevate your overall appearance and boost your confidence. Yet, many factors, including dry weather, smoking, or daily wear and tear, can rob them of their natural charm. Enter: Lip scrubs. Essential for those striving for luscious, hydrated lips, these exfoliants remove dead skin and rejuvenate the surface. In this guide, we delve deep into the best lip scrubs for dry lips, smoker lips, men, and more.

Understanding the Need for Lip Scrubs

Why Exfoliate the Lips?

  • Smooth Surface for Lip Products: Exfoliated lips offer a smoother canvas for lipsticks and glosses, ensuring longevity and a flawless finish.
  • Stimulates Blood Flow: Regular exfoliation promotes circulation, imparting a rosy hue to the lips.
  • Enhances Natural Moisture: By removing dead cells, the lips can better absorb lip balms and treatments.

Best Lip Scrubs for Different Needs

Dry Lips

Hydrating Honey & Sugar Scrub
Honey, a natural humectant, combined with sugar granules provides a gentle yet effective exfoliation.

Ingredients:

  • 1 tablespoon honey
  • 2 teaspoons granulated sugar

Application:

Mix the ingredients. Apply the mixture onto your lips in gentle circular motions. Rinse after 5 minutes.

Smoker Lips

Activated Charcoal & Coconut Oil Scrub
Activated charcoal draws out impurities while coconut oil nourishes.

Ingredients:

  • 1 teaspoon activated charcoal
  • 1 tablespoon coconut oil

Application:

Blend the ingredients well. Apply on lips and massage for 3 minutes. Wipe away with a damp cloth.

For Men

Coffee Grounds & Olive Oil Scrub
Coffee’s coarse texture efficiently exfoliates, and olive oil provides essential hydration.

Ingredients:

  • 1 tablespoon fresh coffee grounds
  • 2 teaspoons olive oil

Application:

Combine the ingredients. Scrub onto lips for 2-3 minutes. Rinse with lukewarm water.

And More…

Rose Petal & Almond Oil Scrub
Ideal for sensitive lips, rose petals soothe, and almond oil deeply moisturizes.

Ingredients:

  • 5 crushed rose petals
  • 1 tablespoon almond oil

Application:

Mix the petals and oil. Apply the blend onto your lips, massaging gently. Wash off after 5 minutes.

Picking the Right Lip Scrub: Key Considerations

  1. Natural Ingredients: Opt for scrubs with organic ingredients to avoid harmful chemicals.
  2. Appropriate Granule Size: Larger granules can be too abrasive. Choose a scrub with finely milled particles for gentle exfoliation.
  3. Hydrating Components: Ingredients like shea butter, vitamin E, and oils ensure your lips remain moisturized post-exfoliation.

Enhance the Experience: DIY Lip Mask

After exfoliating, nourish your lips with a simple DIY mask.

Ingredients:

  • 1 teaspoon honey
  • 1 teaspoon yogurt

Application:

Combine and apply to lips. Let sit for 10 minutes, then rinse.

Conclusion

To maintain the soft allure of your lips, regular exfoliation with the right lip scrub tailored to your needs is paramount. Pair this with hydration and protection, and you’ll boast a radiant, captivating smile. Embrace this essential step in your skincare regime today and relish the benefits!

Semi Permanent Eyebrows Aftercare

permanent makeup proud portfolio

Why is it essential to use lip scrubs?

Lip scrubs are essential for maintaining soft, supple lips by removing dead skin, promoting blood flow, and enhancing the natural moisture retention of the lips.

Which lip scrub is recommended for dry lips?

For dry lips, the Hydrating Honey & Sugar Scrub is recommended due to honey’s natural humectant properties combined with the exfoliating effect of sugar granules.

How can smoker lips benefit from a lip scrub?

The Activated Charcoal & Coconut Oil Scrub is ideal for smoker lips as activated charcoal draws out impurities and coconut oil provides nourishment.

Is there a specific lip scrub tailored for men?

Yes, the Coffee Grounds & Olive Oil Scrub, which leverages the coarse texture of coffee for exfoliation and olive oil for hydration, is tailored for men.

What lip scrub is recommended for sensitive lips?

For sensitive lips, the Rose Petal & Almond Oil Scrub is advised as rose petals soothe and almond oil provides deep moisturization.

Why is natural ingredient preference emphasized in lip scrubs?

Opting for lip scrubs with organic ingredients helps avoid potential harm from chemicals and ensures a natural, gentle care for the lips.

How does exfoliation enhance the lips’ natural moisture?

By removing dead cells through exfoliation, the lips can better absorb lip balms and treatments, thereby enhancing their natural moisture.

Can I make my own lip scrub at home?

Yes, the article provides DIY lip scrub recipes using easily accessible ingredients like honey, sugar, activated charcoal, coconut oil, coffee grounds, and more.

What should I do post exfoliation for better lip care?

After exfoliating, it’s recommended to nourish your lips with a lip mask, like the DIY honey and yogurt mask, followed by a hydrating lip balm.

Why is the granule size in lip scrubs important?

The granule size matters as larger granules can be too abrasive for the delicate lip skin. A scrub with finely milled particles ensures gentle exfoliation.

bb glow aftercare

BB Glow Aftercare: Protecting Your Radiant Skin

bb glow aftercare

Table of Contents

BB Glow Aftercare: Protecting Your Radiant Skin

You’ve made the empowering decision to gift yourself the wonders of BB Glow. The anticipation, excitement, and promise of radiant skin – it’s a transformative journey indeed! But like any cherished treasure, it demands care. And with BB Glow, the aftercare is paramount to bask in its long-term luminance.

Introduction to BB Glow

What is BB Glow?

BB Glow, an innovative and non-surgical treatment, offers a fusion of microneedling and a special tinted serum application. The results? Diminished freckles, harmonized skin tones, and an overall youthful glow. But the true magic lies in the duo – the microneedling pen, a collagen-boosting magician, and the BB glow serum, the potion of radiance.

Key Benefits of BB Glow

Beyond offering you an even skin tone, BB Glow is the key to:

  • Less visible wrinkles.
  • A bright, semi-permanent skin tint.
  • Rejuvenated skin.

Preparing for BB Glow Treatment

Steps to Prepare

  • Bid adieu to Retin-A products at least 10 days prior.
  • A 6-month gap from Accutane is a must.
  • Hold off any autoimmune therapies 12 hours before diving in.
  • Botox? A no-go two weeks before the treatment.
  • Shield your skin from the sun the day before.
  • March in with a makeup-free, pristine face.

Why Preparation is Crucial

Preparation is more than a ritual; it’s the foundation for optimum results. It ensures your skin is in the right state to receive and magnify the treatment’s effects.

Comprehensive BB Glow Aftercare Tips

Initial 24 Hours

Hold off that face wash and ditch any cosmetic application.

12-72 Hours Post-Treatment

Say hello to mineral makeup, gentle cleansers, hyaluronic acid serums, and don’t forget, SPF is your BFF.

Beyond 72 Hours

It’s reunion time with your cherished skincare routine! Products boasting Retinol? They’re your new besties.

Things to Avoid Post BB Glow Treatment

Lifestyle Precautions

For a glow that stays, remember:

  • Makeup, not before 3 days.
  • Sunbathing & sunbeds? Cross them off the list.
  • Keep your skincare scent-free.
  • Neutral water temperature for showers & baths for the next 48 hours.
  • Spicy dishes and seafood get a 3-day break.
  • Retinol and Vitamin C products – a hiatus for 8 weeks.
  • Always, ALWAYS, sport a moisturizing cream with SPF 30 or more.

Maintaining Results

For a glow that’s not just a fling but a long-term relationship, aftercare is the secret. Your efforts in the post-treatment phase determine the longevity and quality of your BB Glow results.

Conclusion and Lasting Benefits of BB Glow

BB Glow isn’t just a treatment; it’s an experience. One that promises and delivers radiant skin. But the post-treatment care is the bridge to that lasting radiance. By honoring the BB Glow aftercare rituals, you’re not just protecting your skin but cherishing a gift you’ve given yourself.

Semi Permanent Eyebrows Aftercare

permanent makeup proud portfolio

With proper aftercare, the effects can last for several months. Regular touch-ups can extend this period.

Mostly, yes. However, always consult with a skincare professional to ensure it’s right for you.

It’s best to wait for at least 3 days before applying makeup.

For optimal results, consider getting touch-ups every few months.

No major downtime is required, but it’s crucial to follow the aftercare tips for best results.

textured-eyebrows-uae

Permanent Makeup Studio: The Definitive Guide to Textured Eyebrows

textured-eyebrows-dubai

Table of Contents

Permanent Makeup Studio: The Definitive Guide to Textured Eyebrows

Introduction: Revolutionizing the Beauty Regimen

At Permanent Makeup Studio, we firmly believe in enhancing natural beauty using the most innovative techniques. Among the latest trends gaining traction, textured eyebrows stand out as a game-changer in the world of facial aesthetics. Through this guide, dive deep into the realm of textured eyebrows, how to attain them, and the best ways to maintain their elegance.

What are Textured Eyebrows?

Textured eyebrows are the epitome of sophistication and organic charm. Unlike conventional methods that offer a single shade or a uniform shape, textured brows celebrate uniqueness. They display multiple tones and employ strategic hairstrokes to create a fuller, yet natural appearance, mimicking the look of real hair.

The Process Behind Achieving Textured Eyebrows

Consultation

We always start with a thorough consultation. This initial step ensures that the outcome aligns perfectly with your expectations.

  1. Discussion: Understand the desired shape, thickness, and tone.
  2. Skin Type Analysis: Determine which technique will offer the best results.

Pre-Procedure Care

Proper preparation is key. This includes:

  • Avoiding direct sunlight or tanning 48 hours prior.
  • Ceasing the use of any retinoids or AHA skincare products a week ahead.
  • Abstaining from alcohol or caffeine 24 hours before the procedure.

Procedure

Our licensed technicians employ a variety of techniques, tailored to individual needs:

  1. Microblading: Uses tiny, fine-point needles to deposit pigment simultaneously, mimicking natural hairs.
  2. Microshading: Best for those seeking a soft, powdered effect, resembling eyebrow makeup.
  3. Ombre Powder Brows: Creates a soft, misty, powder-filled brow similar to the look of makeup.

Post-Procedure Care

Optimal results are achieved with correct aftercare:

  • Avoid touching or wetting the eyebrows for the first week.
  • Apply the recommended ointment to alleviate any dryness or itching.
  • Steer clear of makeup or skincare products directly on the treated area for ten days.

Maintaining the Splendor: Tips and Tricks

  • Regular Touch-ups: While permanent makeup lasts longer than traditional methods, periodic touch-ups ensure your brows always look their best.
  • Sun Protection: Shield your brows from direct sunlight to prevent premature fading.
  • Optimal Skincare: Avoid any exfoliating products on the brow area.
Semi Permanent Eyebrows Aftercare

permanent makeup proud portfolio

Conclusion: Textured Eyebrows - The Future of Beauty

The allure of textured eyebrows is undeniable. At Brows & Lips, we are dedicated to offering this revolutionary service with precision and expertise. Trust in our hands, and step out showcasing eyebrows that are nothing short of a masterpiece.

Textured eyebrows celebrate uniqueness by displaying multiple tones and employing strategic hair strokes. This results in a fuller yet natural appearance that mimics the look of real hair, unlike conventional methods that offer a single shade or uniform shape.

The consultation ensures that the outcome aligns with your expectations. It involves a detailed discussion to understand the desired shape, thickness, and tone, as well as a skin type analysis to determine the best-suited technique.

It’s essential to avoid direct sunlight or tanning 48 hours prior, cease the use of any retinoids or AHA skincare products a week ahead, and abstain from alcohol or caffeine 24 hours before the procedure.

Our technicians use a variety of methods tailored to individual needs. This includes Microblading, which uses tiny needles to deposit pigment; Microshading, ideal for a soft, powdered effect; and Ombre Powder Brows, which create a soft, misty look.

To ensure the best results, avoid touching or wetting the eyebrows for the first week, apply the recommended ointment to alleviate any dryness or itching, and refrain from using makeup or skincare products on the treated area for ten days.

While permanent makeup lasts longer than traditional methods, periodic touch-ups ensure your brows always look pristine and maintain their elegance.

best-spf-lip-balm

The Ultimate Guide to SPF Lip Balm: Protecting Your Lips from Sun Damage

best-spf-lip-balm

Table of Contents

The Ultimate Guide to SPF Lip Balm: Protecting Your Lips from Sun Damage

Lips are one of the most delicate parts of our body, yet they often go unnoticed when it comes to sun protection. Just as we shield our skin from the harmful rays of the sun, our lips too need that layer of protection. SPF lip balm plays a pivotal role in ensuring that our lips remain healthy, soft, and unharmed by UV rays.

Why SPF Lip Balm is an Essential

Our lips are susceptible to the harmful effects of the sun, more than we realize. Their skin is thinner and lacks the protective melanin that our skin has. This makes them more vulnerable to sunburns, premature aging, and even skin cancers. Here’s why an SPF lip balm is non-negotiable:

  • Prevents Sunburns: Lips can easily get sunburned, leading to redness, peeling, and pain. Regular application of SPF lip balm can help avoid this discomfort.

  • Avoids Premature Aging: Exposure to UV rays can lead to premature aging signs like fine lines and wrinkles on the lips. SPF lip balm acts as a barrier, preventing these early signs of aging.

  • Reduces Cancer Risk: Chronic sun exposure without protection can increase the risk of lip cancers. Using lip balms with SPF can significantly reduce this risk.

Choosing the Right SPF Lip Balm

When selecting an SPF lip balm, it’s not just about the sun protection factor. Consider the following:

  • Broad Spectrum Protection: Ensure your lip balm offers protection against both UVA and UVB rays.

  • Water Resistance: For those beach days or poolside relaxations, a water-resistant SPF lip balm can be beneficial.

  • Natural Ingredients: Opt for lip balms with natural moisturizing ingredients like shea butter, vitamin E, or aloe vera. This ensures not just protection but also nourishment.

Ingredients to Avoid in SPF Lip Balm

It’s essential to be aware of certain ingredients that might be harmful:

  • Oxybenzone and Octinoxate: These chemical sunscreens can cause allergic reactions in some individuals.

  • Artificial Fragrances and Colors: These might irritate sensitive lips.

Semi Permanent Eyebrows Aftercare

permanent makeup proud portfolio

How to Apply SPF Lip Balm Effectively

  1. Frequency: Reapply lip balm every two hours, especially after eating or drinking.
  2. Amount: Ensure you’re applying a generous amount to cover your entire lips.
  3. Night-time Care: Even after the sun goes down, keep your lips moisturized with a hydrating lip balm to repair any damage.

The Connection Between Hydration and Lip Health

Drinking ample water keeps the skin and lips hydrated. When your body is hydrated, the lips are less likely to crack or become dry. Along with SPF lip balm, ensure you’re drinking at least 8 glasses of water a day for optimal lip health.

Conclusion

Our lips are a reflection of our overall health and well-being. Just as we invest time and money in skincare, our lips too deserve the same attention. Incorporating SPF lip balm into our daily routine can make a world of difference, ensuring that our lips remain soft, supple, and safe from the detrimental effects of the sun. Remember, sun protection is not just for beach days; it’s a daily necessity. So, don’t forget to swipe that SPF lip balm every day!

SPF lip balm is crucial for protecting the lips from sunburns, premature aging, and reducing the risk of lip cancers due to its thinner skin and lack of melanin.

While regular lip balms provide moisture, SPF lip balms contain sun protection factors to shield lips from harmful UVA and UVB rays.

It’s ideal to choose lip balms with broad-spectrum protection, natural moisturizing ingredients like shea butter, vitamin E, and aloe vera, and those that are water-resistant.

Yes, avoid lip balms containing oxybenzone, octinoxate, and artificial fragrances and colors as they might cause allergic reactions or irritate sensitive lips.

It’s recommended to reapply SPF lip balm every two hours, especially after eating or drinking.

Absolutely! Drinking ample water helps keep the skin and lips hydrated. When the body is well-hydrated, the lips are less likely to become dry or crack, complementing the effects of SPF lip balm.

Screatch Mark Camouflage Dubai

Inkless Stretch Mark Camouflage Aftercare

Screatch Mark Camouflage Dubai

Table of Contents

Inkless Stretch Mark Camouflage Aftercare

Inkless Stretch Mark Camouflage and Revision (ISR) is a groundbreaking treatment that significantly enhances the appearance of stretch marks by improving their tone, texture, and color. The overwhelming majority of patients experience substantial improvement after just a single session, although the total number of treatments can vary up to three or four times. The unique journey of every individual is carefully monitored through photographs, ensuring clear communication regarding progress and the potential need for further appointments.

Post-Treatment Immediate Effects

Expectations After the Treatment: After undergoing ISR treatment, it’s typical to observe redness and swelling in the stretch mark area, making it look inflamed. This condition, which lasts for about two weeks, is a normal and expected part of the healing process.

Essential Aftercare Tips:

  • Refrain from wearing tight clothing for the initial 2 to 3 days.
  • Avoid scratching or peeling the area to steer clear of infection and discoloration.
  • Limit exposure to water pressure and refrain from excessive sweating for the first week.
  • Postpone tanning, swimming, and the use of perfumed products for the specified period.

Detailed Day-by-Day Aftercare Plan

Day 1-4:

  • Steer clear of Advil for the next 24 hours.
  • The area will experience redness, swelling, and a sunburn-like feeling.
  • Avoid heat exposure; however, gentle showering is permitted after 12 hours.
  • Clean the area with a mild cleanser and apply recommended aftercare products like Cereve or Coconut Oil to keep it hydrated.

Day 3-7:

  • The treated skin will start to dry and may flake or scab slightly.
  • Continue the application of aftercare cream twice daily.

Important Reminder: Always protect the treated area with sunscreen when exposed to sunlight!

Weekly Aftercare Overview

Week One:

  • Expect the skin to be dry, flaky, and irritated.

Week Two:

  • Noticeable reduction in inflammation and swelling.
  • Optional: Use Cicaplast (La Roche Posay) twice daily for added moisturization.

Even after two weeks, some redness or hyperpigmentation may persist. Continue monitoring and documenting the progress by sending photos at 2-4 week intervals.

Semi Permanent Eyebrows Aftercare

permanent makeup proud portfolio

Moving Forward: Next Steps and Additional Sessions

Post two weeks, even as the skin continues to return to its normal state, certain areas may exhibit sustained redness and/or hyperpigmentation. Every individual’s healing rate is distinct and influenced by various factors including overall health, metabolism, and lifestyle. Slow healers might have their next session scheduled around the 60-day mark to ensure optimal healing before proceeding.

Inkled Camouflage: For cases requiring more than three sessions, and qualifying for inked camouflage, this option can be explored for enhanced results.

Special Note for Darker Skin Types: Individuals with darker skin tones should ideally wait for 2-4 months between treatments to ensure complete healing and minimize the risk of intense hyperpigmentation.

In conclusion, dedicated adherence to this comprehensive aftercare guide ensures optimal healing and results from the ISR treatment, promising improved appearance and texture of stretch marks, and enhancing overall skin health and confidence.

Post-treatment, it’s common to notice redness, swelling, and an inflamed appearance in the treated area. This condition is a regular part of the healing process and typically lasts for about two weeks.

Yes, it’s crucial to avoid tight clothing, scratching, or peeling the area and limit water and heat exposure for specified periods. Additionally, the consistent application of recommended aftercare products is vital for optimal healing.

Avoid taking Advil, and stay away from all things hot, such as saunas and hot tubs. It’s advised to gently cleanse the treated area and apply aftercare products like Cereve or Coconut Oil to keep it hydrated.

During the first week, expect the skin to be dry, flaky, and irritated. Continue to follow the aftercare regimen strictly, including protecting the area with sunscreen when exposed to sunlight.

Even after two weeks, some redness or hyperpigmentation may remain. Keep monitoring the skin and send progress photos at 2-4 week intervals for proper assessment and further guidance.

The requirement for additional sessions depends on individual healing rates. For those healing slowly, the next session might be scheduled around the 60-day mark. It’s essential to ensure complete healing before proceeding with further treatment.

lip-anatomy-pmu

Master the Intricacies of Lip Anatomy for Unmatched Permanent Makeup Results

lip-anatomy-pmu

Table of Contents

Master the Intricacies of Lip Anatomy for Unmatched Permanent Makeup Results

Hey there! In the dazzling domain of permanent makeup, getting up close and personal with lip anatomy is not just important, it’s essential. Let’s navigate the delicate pathways of the lips’ structure, a journey that promises spectacular and authentically beautiful outcomes. Ready to dive deep into the world of lip anatomy for PMU artists? Let’s traverse each aspect, observing every detail with precision and care.

Lip-Anatomy
Source: pmuhub.com

Unveiling the Layers of the Lip

Delving into the lips, did you know they are composed of three main layers?

  • The Outer Layer (Epidermis): It might be thin, but it’s mighty, providing a shield and adding to the lips’ texture.
  • The Middle Layer (Dermis): Filled with collagen and elastic fibers, this layer gives lips their form and flexibility.
  • The Inner Layer (Mucous Membrane): This is the hydration hero, keeping the lips moisturized.

The Significance of the Vermilion Border

Spot the clear line between the lips and the neighboring skin? That’s the Vermilion Border, a pivotal reference for PMU artists, assuring pinpoint accuracy in application.

Philtrum and Cupid’s Bow: The Aesthetics Anchors

The Philtrum and Cupid’s Bow are monumental in achieving that perfect lip symmetry and allure. Sharpening their definition can drastically enhance the overall lip look, making them crucial focus points for PMU artists.

Semi Permanent Eyebrows Aftercare

permanent makeup proud portfolio

Navigate the Lip Zones

  • Dry and Wet Vermilion:
    • Dry Vermilion: Comparable to skin and visible outside the mouth.
    • Wet Vermilion: Nestled inside the mouth, it’s moist and primarily mucosal.
  • The Oral Commissures: This is where the upper and lower lips unite, crucial for outlining lip shape and dimensions.
lip-veins-anatomy
Source: pmuhub.com

Advanced Techniques for Flawless PMU Application

  • Precision in Lip Mapping: Essential for symmetrical and balanced outcomes, marking the lips designates areas for color application and enhancement.
  • Selecting the Right Needle: Choosing the perfect needle for PMU guarantees optimal pigment deposit and minimal lip trauma.

Exploring the Lip Color Theory

For PMU artists, grasping the lip color theory is pivotal. It empowers the selection of shades that harmonize with individual skin tones and preferences, assuring every client walks away smiling.

Source: pmuhub.com

Final Reflections on Lip Anatomy for PMU Artists

Conquering the world of lip anatomy is foundational for superb PMU results. A detailed understanding of lip layers, the vermilion border, and specific zones, amalgamated with superior application techniques, guarantees unmatched precision, symmetry, and aesthetic allure in every PMU procedure. So why wait? Elevate your artistry, embrace the exhaustive knowledge of lip anatomy, and emerge as a standout PMU artist in the industry.

Understanding lip anatomy ensures every PMU procedure is a masterpiece of precision, symmetry, and aesthetic appeal.

Certainly! They are the epidermis, dermis, and mucous membrane.

It’s the distinct margin between the lips and the surrounding skin.

Lip mapping is all about marking the lips to specify areas for color application and enhancement.

The right needle ensures maximum pigment deposit and minimum trauma to the lips, making it a crucial choice for every PMU artist.

fordyce-spots-on-lips

Fordyce Spots on Lips: Comprehensive Causes and Effective Treatments

fordyce-spots-on-lips

Table of Contents

Fordyce Spots on Lips: Comprehensive Causes and Effective Treatments

Fordyce spots, often recognized for their minuscule, yellow-white appearance, predominantly arise on the lips and can be a cosmetic concern for many. Though they’re medically harmless, understanding their origin and methods of treatment can be reassuring for those who experience them.

What Are Fordyce Spots?

Fordyce spots, or Fordyce granules, are small, painless, pale bumps that measure between 1-3 millimeters in diameter. These ectopic sebaceous glands are not attached to hair follicles and, hence, appear more prominent than other sebaceous glands.

Causes of Fordyce Spots on Lips

Natural Development

  • Sebaceous Glands: The primary cause behind Fordyce spots is the sebaceous glands’ misplacement. These glands are typically found in association with hair follicles but can occasionally develop in areas without hair, such as the lips.

  • Genetics: A predisposition to Fordyce spots can be inherited. If family members display these spots, there’s a possibility you might develop them as well.

Hormonal Changes

Fluctuations in hormones, especially during puberty, can lead to the enlargement or increased prominence of these spots.

Symptoms and Diagnosis

Though Fordyce spots are asymptomatic, their distinctive appearance can make them easily recognizable:

  • Pale, yellow-white bumps
  • Smooth surface
  • Located on the lips’ inner surface or the vermillion border

A visual examination is generally adequate for diagnosis. However, in rare cases, a biopsy might be conducted to rule out other potential conditions.

Semi Permanent Eyebrows Aftercare

permanent makeup proud portfolio

Treatments and Remedies

Medical Procedures

Electrodesiccation

A process that employs electrical currents to dehydrate the Fordyce spots, leading to their eventual removal.

Laser Treatments

CO2 laser and pulsed dye lasers are frequently utilized for treating Fordyce spots. They work by targeting the blood vessels within the spots, thereby reducing their appearance.

Micro-punch Surgery

This technique involves using a microscopic device to excise the spots individually.

Paramedical Treatments

Lip Blushing

Lip blush is a cosmetic tattooing procedure that enhances the natural color and shape of the lips. However, it’s essential to note that lip blush itself is not a treatment for Fordyce spots.

Fordyce spots are sebaceous glands that appear on the lips, and while they can be a cosmetic concern, they are not harmful. The lip blush procedure can potentially camouflage the appearance of Fordyce spots by giving the lips a more uniform color, but it does not eliminate or reduce Fordyce spots in any way. It is a cosmetic enhancement and should be considered as such.

For individuals considering lip blush to disguise Fordyce spots, it’s crucial to have realistic expectations and consult with a qualified professional to discuss potential outcomes and other more effective treatments for Fordyce spots.

Topical Treatments

Retin-A (Tretinoin)

A derivative of vitamin A, Retin-A can aid in decreasing the prominence of Fordyce spots by hastening cell turnover.

Chemical Peels

Mild chemical peels, containing glycolic acid or salicylic acid, can help in reducing the appearance of the spots.

Natural Remedies

Coconut Oil and Essential Oils

A blend of coconut oil and essential oils such as lavender or tea tree can hydrate the lips and reduce irritation.

Jojoba Oil and Argan Oil

These oils resemble natural skin oils and can diminish the spots by moisturizing and nourishing the skin.

Tips for Preventing Fordyce Spots

  • Hydrate: Drinking ample water keeps the skin hydrated and potentially reduces the occurrence of the spots.

  • Balanced Diet: Incorporating foods rich in vitamins and minerals, especially vitamin A, E, and K, can bolster skin health.

  • Lip Care: Regularly moisturizing lips can keep them nourished, thereby potentially minimizing the risk.

Conclusion

Fordyce spots on lips, although benign, can be a cosmetic concern for many. Through a combination of medical procedures, topical treatments, and natural remedies, the prominence of these spots can be diminished. With the right knowledge and approach, managing Fordyce spots becomes a straightforward task.

Fordyce spots, or Fordyce granules, are small, painless, pale bumps that are ectopic sebaceous glands. They are not attached to hair follicles, making them more noticeable.

The primary cause is the misplacement of sebaceous glands. They can also be influenced by genetics and hormonal changes, especially during puberty.

They are mostly diagnosed through a visual examination due to their distinctive appearance. In rare scenarios, a biopsy might be required.

No, Fordyce spots are medically harmless and are typically asymptomatic. They can, however, be a cosmetic concern for some.

Medical procedures include electrodesiccation, laser treatments, and micro-punch surgery.

Yes, topical treatments such as Retin-A (Tretinoin) and mild chemical peels can help reduce their appearance.

Natural remedies include using a blend of coconut oil with essential oils or applying jojoba and argan oils for nourishment.

Staying hydrated, maintaining a balanced diet rich in certain vitamins, and regular lip care can potentially reduce their occurrence.

can-you-kiss-after-lip-blush

The Ultimate Guide to Lip Blush Post-Care: Can You Kiss After the Treatment?

kiss-after-lip-blush

Table of Contents

Lip Blush Post-Care: Can You Kiss After the Treatment?

Lip blush is an increasingly popular cosmetic procedure known for its ability to deliver natural-looking tinted lips. As with any cosmetic procedure, there are post-care guidelines that ensure optimal results and longevity. One common question we receive at our Permanent Makeup Studio is, “Can you kiss after getting a lip blush?” Let’s delve into the details.nn

Understanding the Lip Blush Procedure

Lip blush is a form of semi-permanent makeup that uses micropigmentation to infuse the lips with a natural, subtle color. The procedure involves:

  1. Consultation: Assessing the natural lip color and determining the desired shade.
  2. Numbing: Applying a numbing cream to reduce discomfort.
  3. Pigmentation: Using specialized equipment to deposit the chosen pigment into the lips.
  4. Finalizing: Cleaning the treated area and giving post-care instructions.

Post-Lip Blush: The Immediate Aftercare

Why Kissing is a No-No

After the lip blush procedure, the lips are essentially a treated wound. Engaging in activities like kissing can introduce bacteria, leading to potential infections or complications. Moreover, the pressure from kissing can cause the freshly deposited pigment to shift, compromising the final appearance.

The First 48 Hours: Crucial Care Steps

  • Avoid Kissing: For the reasons mentioned above, refrain from any lip-to-lip contact.
  • Stay Hydrated: Drink ample water, but be cautious not to wet the treated area.
  • Don’t Touch: Resist the urge to touch, scratch, or peel any flaking skin.
  • Avoid Hot Foods & Drinks: This can cause unnecessary irritation.

How Long to Wait Before Kissing After Lip Blush?

The general recommendation is to wait at least 7-10 days post-treatment before engaging in any lip activities, including kissing. This gives the lips adequate time to heal and the pigment to settle properly. However, always follow the specific instructions provided by your technician.

Semi Permanent Eyebrows Aftercare

permanent makeup proud portfolio

Enhancing and Prolonging Your Lip Blush Results

Regular Lip Care

Invest in a good lip balm or moisturizer to keep the lips hydrated. This not only ensures the pigment looks its best but also extends the longevity of the lip blush.

Protect from UV Rays

Exposure to the sun can cause the pigment to fade faster. Always apply a lip balm with SPF when heading outdoors.

Regular Touch-Ups

Over time, the lip blush may start to fade. Regular touch-ups, usually once a year, can help maintain the vibrancy and freshness of the color.

Conclusion

Lip blush is a transformative procedure that can enhance one’s natural beauty. Proper aftercare is paramount to ensure impeccable results. At the Permanent Makeup Studio, we prioritize our clients’ well-being and satisfaction. Adhering to the guidelines and understanding the healing process is the key to a successful lip blush experience.

Lip blush is a semi-permanent makeup technique that infuses the lips with a natural, subtle color using micropigmentation.

Typically, a lip blush procedure takes between 1.5 to 2 hours, including consultation and numbing time.

The Eyebrow Stamp Stencil Kit by OETUIOW offers the most versatility with 24 different stencils to choose from, making it suitable for various brow shapes and styles.

Most clients experience minimal discomfort, especially since a numbing cream is applied prior to the procedure. However, individual pain thresholds may vary.

Lip blush generally lasts between 1 to 3 years, depending on individual skin types, lifestyle, and aftercare adherence.

Absolutely! During the consultation, you’ll discuss your desired shade with the technician, ensuring a color that complements your natural lip tone.

For the first 48 hours, it’s crucial to avoid kissing, touching the treated area, consuming hot foods and drinks, and wetting the lips excessively.

It’s generally safe to resume regular lip activities after 7-10 days, but always consult with your technician for personalized advice.

Yes, to maintain the vibrancy and freshness of the color, it’s recommended to have regular touch-ups, usually once a year.

Some individuals may experience slight swelling, redness, or flaking after the procedure. These are common and usually subside within a week. However, if you notice any signs of infection or prolonged discomfort, it’s important to consult with your technician.

Regular lip care, including hydration, protection from UV rays with an SPF lip balm, and adhering to the aftercare guidelines provided by your technician, will help prolong and maintain the results.

Best Eyebrow Stamp Kits of 2023 pros and cons

The Ultimate Guide to the Best Eyebrow Stamp Kits of 2023

Best Eyebrow Stamp Kits of 2023

Table of Contents

The Ultimate Guide to the Best Eyebrow Stamp Kits of 2023: Pros, Cons, and More

Introduction

Achieving the perfect eyebrows can be a daunting task, especially when you’re doing it at home. Traditional methods like pencils and pomades require a steady hand and a lot of practice. If you’re looking for a simpler, more foolproof way to get those brows on fleek, eyebrow stamp kits might be your new best friend. Here’s our comprehensive guide to the best eyebrow stamp kits available in 2023, complete with pros and cons to help you make an informed decision.

Why Choose an Eyebrow Stamp Kit?

Ease of Use

Eyebrow stamp kits are incredibly user-friendly. They come with a stamp and stencil that you simply press onto your brow area, eliminating the need for freehand drawing.

Time-Saving

These kits can significantly cut down the time you spend on your brows, making them ideal for those busy mornings.

Affordability

Compared to other trendy eyebrow solutions, stamp kits are relatively affordable and offer great value for money.

Top Picks for 2023

1. MADLUVV Eyebrow Stencil Kit

Pros

  • Comes in 8 different colors to match your natural brows.
  • Includes 6 different stencils for various looks.
  • Certified by PETA as cruelty-free and vegan.

Cons

  • The most expensive option on our list.

2. iMethod Eyebrow Stamp and Eyebrow Stencil Kit

Pros

  • Offers 11 color options.
  • Includes a spoolie, a brush, 10 stencils, a brow pomade, and a sponge applicator.
  • Long-lasting and waterproof pomade.

Cons

  • Some users report that the colors appear darker than they seem online.

3. Eyebrow Stamp Stencil Kit by OETUIOW

Pros

  • Features an impressive 24 stencils for maximum versatility.
  • Comes with 6 color options.
  • Smudge- and waterproof pomade.

Cons

  • Users report that the pomade tends to rub off easily.

4. i-ENVY Brow Stamp by KISS

Pros

  • Highly affordable.
  • Extremely easy to use with a straightforward design.

Cons

  • Limited to just two shapes.
  • Difficult to clean.

How to Use an Eyebrow Stamp Kit

  • Remove any existing brow products.
  • Choose a stencil that matches your desired shape.
  • Align the stencil with your natural brow, starting from the tail.
  • Press the stamp onto the stencil.
  • Lift the stencil gently.
  • Use a spoolie to brush and blend.
  • Fill in any gaps with additional products.
  • Repeat for the other brow.
Semi Permanent Eyebrows Aftercare

permanent makeup proud portfolio

Conclusion

Eyebrow stamp kits offer a convenient and efficient way to achieve perfect brows. Whether you’re a beginner or a makeup pro, these kits can simplify your beauty routine and give you the confidence to face the day with impeccable brows. Choose the one that best suits your needs and enjoy hassle-free grooming!

Would you like to know more about semi-permanent brow options or have any other questions? Feel free to ask!

Eyebrow stamp kits offer ease of use, time-saving convenience, and affordability. They are perfect for those who want to achieve flawless brows without spending too much time or money.

To use an eyebrow stamp kit, you’ll need to remove any existing brow products, choose a stencil, align it with your natural brow, press the stamp onto the stencil, and then lift it gently. Use a spoolie to brush and blend, and fill in any gaps with additional product.

The Eyebrow Stamp Stencil Kit by OETUIOW offers the most versatility with 24 different stencils to choose from, making it suitable for various brow shapes and styles.

Yes, both the MADLUVV Eyebrow Stencil Kit and the iMethod Eyebrow Stamp and Eyebrow Stencil Kit are certified by PETA as cruelty-free and vegan.

Consider factors like the number of color options, the variety of stencils, whether the product is cruelty-free, and user reviews regarding the product’s longevity and ease of use.

The i-ENVY Brow Stamp by KISS is a highly affordable option that offers quality comparable to high-end brands, making it a great choice for those on a budget.

best-sunscreen-for-microbladed-eyebrows-and-other-pmu

Choosing the Best Sunscreen for Microbladed Eyebrows and PMU

best-sunscreen-for-microbladed-eyebrows-and-other-pmu

Table of Contents

Choosing the Best Sunscreen for Microbladed Eyebrows and PMU

When it comes to caring for your microbladed eyebrows or permanent makeup (PMU), selecting the right sunscreen is paramount. The delicate skin in these areas requires special attention and protection from the sun’s harmful rays. In this comprehensive guide, we will delve into the nuances of choosing the best sunscreen for microbladed eyebrows and PMU to ensure that your investment in beauty stays vibrant and long-lasting.

Understanding the Importance of Sunscreen for Microbladed Eyebrows and PMU

Microblading and PMU procedures involve semi-permanent pigments applied to the skin’s surface. Over time, exposure to UV rays can cause these pigments to fade and break down. This not only affects the longevity of your enhanced features but can also lead to undesirable color changes and unevenness.

Factors to Consider

SPF Rating

When selecting a sunscreen, it’s crucial to opt for one with a high SPF rating. SPF (Sun Protection Factor) measures a product’s ability to shield your skin from harmful UVB rays, which are responsible for burning. For microbladed eyebrows and PMU, SPF 30 or higher is recommended to provide ample protection.

Broad-Spectrum Protection

Look for sunscreens labeled as “broad-spectrum.” These formulations safeguard against both UVB and UVA rays. UVA rays can cause premature aging and contribute to pigment fading, making them a particular concern for microbladed and PMU-treated areas.

Water-Resistance

As these procedures are often in areas prone to sweat and moisture, a water-resistant sunscreen is advantageous. It ensures that your protection remains intact, even if you perspire or come into contact with water.

Sunscreen Types

Mineral Sunscreens

Mineral sunscreens, containing zinc oxide or titanium dioxide, form a physical barrier on the skin’s surface, reflecting and scattering UV rays. They are gentle on sensitive skin and ideal for microbladed eyebrows and PMU as they offer immediate protection upon application.

Chemical Sunscreens

Chemical sunscreens, such as avobenzone or octisalate, work by absorbing UV rays and converting them into heat, which is then released from the skin. While effective, some individuals with sensitive skin may experience irritation.

Semi Permanent Eyebrows Aftercare

permanent makeup proud portfolio

Application Tips

Apply Generously

For adequate protection, apply sunscreen generously to your microbladed eyebrows and PMU-treated areas. A dime-sized amount should suffice for each eyebrow. Be sure to cover every exposed part, including the tail and arch of your brows.

Reapply as Needed

Sunscreen’s effectiveness diminishes over time, especially when exposed to sunlight. Reapply every two hours when outdoors, and more frequently if swimming or sweating. Don’t forget to reapply after wiping or rubbing the area.

Sunscreen and Makeup Compatibility

Many people wonder if sunscreen can be used with makeup. The answer is yes, but it requires a specific approach. Opt for a sunscreen with a lightweight, non-greasy formula to avoid interfering with your makeup application. Alternatively, some makeup products now include SPF, providing an added layer of protection.

Avoiding Common Pitfalls

Avoid Oils and Greasy Products

Products like facial oils and heavy moisturizers can break down sunscreen and reduce its effectiveness. Opt for oil-free or matte-finish products to keep your microbladed eyebrows and PMU looking flawless.

Be Cautious with Exfoliation

Avoid aggressive exfoliation treatments near treated areas, as they can accelerate pigment fading. Opt for gentle exfoliation methods and consult with your technician for guidance.

Conclusion

In conclusion, the key to preserving your microbladed eyebrows and PMU is choosing the right sunscreen and using it correctly. By selecting a high SPF, broad-spectrum sunscreen, applying it generously, and reapplying as needed, you can ensure that your enhanced features stay vibrant and beautiful. Remember to exercise caution with makeup products and exfoliation, and your microbladed eyebrows and PMU will remain a stunning and long-lasting investment in your beauty regimen.

To learn more about our services please visit the price list page or contact us directly.

Lip Blushing Dubai UAE

Embrace a New Shade of Beauty: A Dive into Lip Blushing

Lip Blushing Dubai

Table of Contents

Embrace a New Shade of Beauty: A Dive into Lip Blushing

Welcome to Brows & Lips, your trusty companion on this vibrant journey of beauty and self-expression. Today, we’re shedding light on a cosmetic gem that has been gaining traction, transforming smiles, and capturing hearts worldwide—lip blushing.

Awaken Your Beauty: Understanding Lip Blushing

Lip blushing is your ticket to an ever-lasting, kissable pout, no daily touch-ups needed! Imagine a semi-permanent solution that graces your lips with added fullness, vibrancy, and youthful charm. With its delicate use of organic pigments, lip blushing enhances your natural lip color, smoothens out asymmetry, and lends an illusion of fullness—an artist’s stroke on the canvas of your charm.

The Art Meets Science: Demystifying the Lip Blushing Process

Lip blushing is as much an art as it is science. Your journey begins with a heart-to-heart consultation to uncover your beauty aspirations and handpick the pigment shade that harmonizes with your skin tone.

The Symphony of Lip Blushing

he lip blushing process sings a four-part harmony:

  1. The Prelude – Consultation and Color Selection: A warm-up chat to understand your lip goals, medical history, and select the perfect color match.
  2. The Crescendo – Preparation: A gentle application of a topical numbing cream to keep you comfortable.
  3. The Chorus – Pigmentation: A symphony of delicate strokes using a digital machine and a sterile, single-use needle, infusing the chosen pigment into your lips.
  4. The Finale – Healing: A soothing balm is applied, setting the stage for a successful healing process.
Semi Permanent Eyebrows Aftercare

permanent makeup proud portfolio

The Enduring Charm: Longevity of Lip Blushing Results

Just like a beautiful melody, lip blushing lingers. You can expect your new radiant smile to last between 2-5 years, with occasional touch-ups to keep the vibrancy alive.

The Tender Aftercare: Ensuring the Perfect Outcome

Loving care in the days following the procedure ensures your new blush blooms beautifully. Some heartfelt advice includes:

  • Opting for mild foods and cooler beverages for a few days
  • Taking a brief break from swimming or any activities that could excessively wet the lips
  • Resisting the temptation to pick at your lips as they heal

The Grand Reveal: Before and After Lip Blushing

Just like a master artist reveals their masterpiece, we invite you to witness the transformative power of lip blushing. Visit our comprehensive gallery of before and after images right here.

At Brows & Lips, we aim to be the guiding light on your path to beauty. With our comprehensive guide on lip blushing, we hope to have kindled your curiosity and fueled your understanding of this exciting procedure. Remember, every beauty journey is a unique masterpiece, just like the ever-changing patterns of a kaleidoscope. And so is yours—let’s cherish it together!

To know more about our services please visit price list page or contact us directly.

Microblading in Dubai

Path to Perfect Brows: A Comprehensive Guide to Microblading

Microblading in Dubai

Your Path to Perfect Brows: A Comprehensive Guide to Eyebrow Microblading and Semi-Permanent Tattoos

Welcome, beauty enthusiasts! Have you ever wondered how your favorite celebrities manage to sport perfect eyebrows all the time? Here’s their secret – Eyebrow Microblading and Semi-Permanent Tattoos. Today, we’re here to be your guiding light, leading you through this intricate world of beauty, one detail at a time.

The Fascinating Realm of Eyebrow Microblading: What It Is and Why You'll Love It

Think of Eyebrow Microblading as the stroke of an artist’s brush on your brows. This semi-permanent tattoo procedure uses precise, custom strokes to create the illusion of natural eyebrow hair. From mimicking your hair color to matching the unique growth pattern of your brows, this is all about customization.

Unsure about what brow shape would suit you the best? Our Eyebrow Shape Guide has you covered.

The Allure of Semi-Permanent Tattoos: An Artistic Revolution

Semi-permanent tattoos are for those who believe in the beauty of change. These tattoos give you the freedom to experience the allure of ink without committing for a lifetime. The secret lies in the vegetable-based ink and the shallower penetration that allows the tattoos to fade away naturally in 1-2 years.

The Journey of Eyebrow Microblading: A Step-by-Step Voyage

Embark with us on this exciting journey to achieving the brows of your dreams:

  1. Consultation: This is your first step to transformation. Discuss your vision with our certified microblading artist who will guide you through a tailored solution just for you.

  2. Outline and Measurement: Your artist will expertly design your brows using specialized tools to complement your facial structure.

  3. Numbing the Area: With a special numbing cream, we ensure a comfortable and pain-free experience.

  4. Microblading: Watch the magic unfold as your artist crafts each stroke on your brows.

  5. Aftercare: We’ll provide you with detailed aftercare instructions to keep your brows looking fabulous for longer.

Discover more about the process in our detailed Microblading Guide.

Semi Permanent Eyebrows Aftercare

permanent makeup proud portfolio

The Yin and Yang of Microblading

Like all things in life, Microblading comes with its own set of pros and cons:

Pros:

  • Designed to complement your unique facial features
  • Say goodbye to daily eyebrow makeup
  • Enjoy the beauty of long-lasting brows

Cons:

  • May require occasional touch-ups
  • Not suitable for certain skin types
  • Comes with a healing period

Preserving Your Microbladed Brows: The Secret of Aftercare

Protect the beauty of your new brows with our aftercare tips:

  • Keep water away from the treated area for a week
  • Apply a healing balm as recommended
  • Shield your brows from the sun

Unsure how to manage it all? Check out our Aftercare Guide.

Picking Your Microblading Artist: Your Partner in Beauty

When seeking the perfect microblading artist, consider their certification, portfolio, and client reviews. The right professional will help you achieve brows that perfectly frame your face and enhance your natural beauty.

Your journey to attaining flawless, semi-permanent brows starts here. With our comprehensive guide, we hope you’re better equipped to step into the world of eyebrow microblading and semi-permanent tattoos with confidence and poise.

To know more about our services please visit price list page or contact us directly.

Hair micropigmentation camouflage

Scalp Camouflage: Everything You Need to Know About Hair Tattoo

Scalp Camouflage: Everything You Need to Know About Hair Tattoo

Find out how to scalp camouflage: works, who it’s for, and how much it costs in our comprehensive guide.

Hair restoration with scalp tattoo gives immediate and guaranteed results. Long-term and relatively cost-effective, it can camouflage bald patches and scars, re-densify bald spots, and bring down a receding hairline.

Learn everything you need to know about scalp micropigmentation or SMP.

SCALP TATTOO: WHAT IT IS

Why Should You Consider Scalp Micropigmentation?

In terms of aesthetics, or paramedical tattooing, scalp camouflage is like a tattoo, but with a few important differences. It creates an illusion of more density by covering the scalp with dots that look like hair follicles, i.e. emerging hair.

Pigments are injected shallowly into the scalp’s skin using a machine designed for cosmetic micropigmentation. Scalp pigmentation is not a traditional tattoo – the colors are formulated differently in order to be absorbed by the body, and they’re implanted closer to the skin’s surface.

It is important to note that scalp camouflage does not last forever, but it can last for up to 8 years.

Scalp Camouflage: Who Is a Candidate?

Hair restoration is for anyone who needs extra density between existing hair which might be thinner than what they want, whether it’s a whole scalp, patches, over scars, or it’s for someone who needs extra density between their existing hair. However, there are some contraindications.

Do you qualify for scalp pigmentation?

There are certain conditions that make cosmetic tattooing unsafe. The following conditions require a doctor’s clearance before you can undergo the treatment:

  • People with diabetes (consult a doctor)
  • Patients with bleeding disorders
  • Those who take blood-thinning medications (consult your doctor and discontinue if possible)
  • Women who are pregnant or nursing
  • Those suffering from hypertrophic scarring or keloids
  • Those suffering from viral infections or diseases
  • Patients undergoing chemotherapy
  • People with scalp irritations or psoriasis
Semi Permanent Eyebrows Aftercare

permanent makeup proud portfolio

Does Scalp Camouflage work on both men and women?

Yes, of course!

There are a number of hair problems that can be solved using this technique. It is possible to recreate hair in the form of skin follicles using scalp micropigmentation, so the results look like freshly shaved heads, but if placed between longer hair, they just look like shades that give the impression of thick hair.

Thin hair and bald spots can occur in both men and women, although men are more likely to experience male pattern baldness and a receding hairline. In addition to areas with no hair, it can also improve the appearance of patches with sparse hair.

It looks like the hair has been shaved off and is just starting to grow in if a larger bald area is treated. The perfect solution for clients who have no or very little hair and cut it very short anyway.

However, it can also densify sparse, longer hair. With the dotting technique, the areas between the natural strands are shaded, giving the appearance of more density. No matter how long the hair is, this technique works well on women. There will still be thin hair, but it will not be as prominently visible through it.

THE EFFECTS OF PIGMENTATION ON THE SCALP

The benefits of scalp camouflage include resolving what issues?

It is possible to treat the entire scalp area or only patches with SMP. The following issues can be camouflaged with scalp pigmentation:

  • The total absence of hair
  • A male pattern baldness (MPB)
  • Hairline receding
  • A patch of baldness
  • Scalp scarring
  • Sparce hair

What is the lifespan of a Hair Tattoo?

The longevity of the results varies from person to person and depends on many factors. Hair micropigmentation usually lasts between 4 and 8 years for most clients, but it can fade after just a year or two or last up to 10 years.

SMP fades gradually as a cosmetic pigmentation. Pigment inks are formulated in such a way that the immune system breaks them down and extracts them from the skin. If you want to keep the results for a longer period of time, you can refresh them periodically.

SCALP CAMOUFLAGE TATTOO TREATMENT

What Are the Steps in Scalp Micropigmentation?

Using scalp micropigmentation, pigment is injected in tiny dots into the skin of the scalp, following a pattern suited to camouflaging the problem. The procedure is performed with a machine that uses a fine needle that imitates a hair follicle’s diameter.

Treatment is a process, and results are achieved after several sessions. The average client needs 2-3 sessions, but more might be needed. Pigment retention depends on the skin.

An overview of the SMP treatment is provided below.

In-person or online consultations

Schedule a consultation with hair micropigmentation at Brows & Lips or simply send a photo of your scalp area. During the consultation, your artist will inspect the area and tell you what results in you can expect. Additionally, the artist informs you of the treatment schedule and instructs you on the aftercare regimen.

It is up to you to decide the shape of the hairline, but it is up to the artist to choose the color.

1st Camouflage Session

As a result of the initial treatment, the look is largely created – the subsequent sessions are top-ups.

A sketch of your future hairline is drawn at the beginning of the session. As soon as you’re satisfied with the result, the artist usually applies a numbing cream to reduce the pain. After 15-20 minutes, the numbing kicks in, and the needling begins. With a pigmentation machine, the artist will saturate the scalp with tiny dots of pigment.

It usually takes 2 to 4 hours for the first session.

2nd Session

The second session is scheduled about 15-30 days after the first. As some pigment from your skin is extracted, your results will initially appear very dark, then lighten over time. One session is not enough to achieve proper saturation, since the skin cannot retain enough pigment in one go.

In the second session, the artist goes over the dots again, replenishing them with pigment. Also, you can modify the shape of the hairline if you wish.

The second session won’t last as long as the first.

3rd Session

Most clients need to return in 15-30 days for another round of hair or skin micropigmentation (but not all – those with excellent retention may not require another treatment).

During this session, a significant amount of pigment should be retained, and you can see how the final result will look. This third session is an opportunity to replenish the pigments a little more.

Treatment Duration: How long does scalp camouflage last?

Hair Micropigmentation Camouflage takes between 2 and 4 hours, depending on the size of the area to be treated. It is expected that the 2nd session will last about half as long as the first, and any additional sessions will be even shorter.

Is hair micropigmentation painful?

You shouldn’t feel pain during the treatment, but you may feel uncomfortable. Before the work begins, artists at Brows & Lips apply a topical anesthetic to the area, which will eliminate the pain.

In spite of this, you will still feel certain sensations such as pressure, tingling, and slight stinging. There won’t be anything unbearable, but it’s best to be prepared.

There are some areas of the scalp that are more sensitive than others, so discomfort may be severe on the temples or the crown. Also, scar tissue can be more sensitive.

Hair micropigmentation camouflage

Is Scalp pigmentation a safe procedure?

If done correctly, yes.

There is a risk of infection or allergic reactions caused by pigments and other products.

If the treatment was performed in unsterile conditions or with unsterilized products, or if improper aftercare was provided, infections can occur. Always go to a certified, licensed places and artists and follow aftercare instructions closely. 

You can be sure to get a safe procedure at Brows & Lips under proper sterile conditions. To prevent allergic reactions, we will conduct a patch test before the treatment.

Camouflage Micropigmentation of the hair affects hair growth?

Not at all. You do not have to worry about the treatment affecting your hair growth since it is above the hair follicles.

SCALP CAMOUFLAGE PREPARATION

What do I need to do to prepare for scalp micropigmentation?

You should avoid these things before the treatment to ensure a smooth experience:

  • For about two weeks, avoid sunbathing and tanning. Skin that is tanned is more sensitive.
  • One month prior to the procedure, stop using any retinol or Vitamin A products on the forehead and temples. As a result, the skin thins out and bleeds more.
  • It is advised that you avoid alcohol, caffeine, ibuprofen, aspirin, and fish oil supplements at least 24 hours before your appointment.
  • Before your treatment, avoid scalp treatments for at least two weeks.
  • Consult your doctor if you are taking blood-thinning medications and see if you can stop using them for a few weeks.

It is also recommended to exfoliate the scalp the day before the treatment to remove dead skin cells or moisturize the scalp to make it softer. 

SMP AFTERCARE

The procedure is relatively non-invasive, but you will need to follow an aftercare routine between sessions until the area heals. As a result, you will need to adjust your washing routine:

  • For three days, keep the scalp dry. It is not allowed to wash, swim, sweat, bathe in saunas, or take steam baths.
  • Wash your head with water between days 3 and 7, but do not use soap or shampoo.
  • When you reach day 7, you can wash your head with mild soap.

In between sessions, and for at least 2 weeks after your last session, avoid the following:

  • Touching your scalp
  • Exposure to sunlight
  • Sweating excessively
  • Taking long, hot showers and being in a steamy environment
  • Head shaving

This is a general guideline for scalp micropigmentation post-care.

How does SMP heal?

Since this treatment involves breaking the surface of the skin, the micro-wounds take a few days to close. You can expect the following after each session:

  • You may experience some redness and irritation (it will subside within a couple of days).
  • In the beginning, the pigments will appear too dark, then too light (they will reach their final color after healing).
  • You may experience dryness and itching in the area – ask your artist for an ointment to relieve these symptoms.
  • Scabs may form over the treated area – do not pick them!

What is the healing time for SMP?

With SMP sessions occurring so close together, the healing cycle will basically continue without interruption. As a result, the healing process has been complete for 4 weeks since the last session.

It takes this long for the pigments to show their true color and for the tissue to fully heal. Once that’s done, you don’t need to pay attention to your scalp, but you should minimize sun exposure and wear SPF when outside.

SCALP CAMOUFLAGE FOLLOW-UP SESSIONS

What is the best time to get an SMP touch-up?

In most cases, the 2nd and 3rd sessions are mandatory. Once you achieve the desired saturation and color, you won’t need to touch up for at least a few years.

Whenever you feel your results have faded significantly, you can get a color refresher touch-up. It is common for clients to come back only after 4 or even 5 years. It all depends on how fast your pigments fade.

If you notice that your hair is fading significantly, it is best to book a touch-up as soon as possible. As the pigments fade, more work will be required and the price will rise.

HAIR MICROPIGMENTATION CORRECTION

Pigmentation on the Scalp: What Can Go Wrong?

Infections, allergic reactions, and permanent scarring are some of the possible side effects of the treatment. You can prevent all of these issues by going to a certified, licensed, and experienced artist who knows what they’re doing does a patch test and gives clear aftercare instructions.

There is a very small chance of a botched SMP, but you might dislike the outline of the hairline or the color. The shape can be corrected and the color can be corrected if that is the case.

How to remove Hair Camouflage Micropigmentation?

Laser removal is an option if you decide to remove your scalp pigmentation at some point. The area of SMP is simply too large to be removed using other methods such as saline or acid removal.

A laser breaks down pigment particles, which are then extracted by the system. Many sessions are required for removal (in some cases, up to 10), and the process can take months. Additionally, it’s painful and quite uncomfortable.

Perhaps waiting until the pigments fade naturally is the best option.

Scalp Pigmentation Camouflage Price

How Much Does Scalp Pigmentation Cost in Dubai?

There are many factors that can affect the price of the SMP treatment, but one of the biggest is the size of the area being treated. Generally, the price range is between AED1500 and AED6000, with scar camouflage and receding hairlines being the cheapest, and full head treatment being the most expensive.

We can determine the cost of treating your particular case by assessing the amount of work required. Contact us at Brows & Lips for more information.

Hair Tattoo Camouflage - KEY TAKEAWAYS

There is no way for scalp micropigmentation to not work because it gives immediate results and camouflages scars or bald patches on the scalp. The process involves inserting dots of pigment into the scalp’s skin. In addition to giving a buzz-cut appearance, it also creates the illusion of more volume for up to 10 years.

To know more about our services please visit price list page or contact us directly.

eyebrow trends natural

Eyebrow Trends – What To Expect From This Season

Eyebrow Trends - What To Expect From This Season

It can be difficult to keep up with eyebrow trends. We have all heard horror stories about permanent eyebrow modifications caused by excessive plucking. Bella Hadid brought back skinny brows from the ’90s earlier this year, which raised eyebrows (and made us wait for the outcome).

1. Lamination of the eyebrows (also known as brow lift)

One of the most popular eyebrow trends for 2022 is brow lamination or brow lift. Semi-permanent treatments result in perfectly positioned and brushed up eyebrows that last for months. As part of the process, the eyebrows are basically restructured and set into the most desirable shape using a set-up product that helps straighten curved hairs and improves the symmetry of the eyebrows. Also, brushing up your eyebrows can help fill in gaps and give the appearance of fuller, thicker brows. A number of high-profile celebrities are also fans of this trend, including Gigi Hadid and Dua Lipa.

2. Brows that are natural

Natural brows are the second most popular brow style. The goal of this trend is to keep your natural shape, just a bit more groomed. The design is not too skinny or too thick to wear, but rather simplistic and minimalist.

3. A fluffy brow

It seems that fluffy eyebrows are staying put for 2023 for the second year in a row. There has been a spotting of Billie Eilish wearing this trend. In this method, the brow hairs are brushed up while still remaining relaxed and natural. Consequently, penciling them in takes less time than applying eyebrow powder.

Semi Permanent Eyebrows Aftercare

permanent makeup proud portfolio

4. An eye-catching feathered brow

Micro-feathering differs from semi-permanent tattooing. As opposed to fluffy eyebrows, these brows are inspired by feathers. To achieve a full, airy look with a lightweight look, use a spoolie to define and flick the eyebrows out.

5. Bleached eyebrows

The bleached brow trend has been tried out by celebrities such as Kim Kardashian, Lady Gaga, and Kendall Jenner. Despite the fact that bleached brows sound terrifying, there is a sneaky hack making its way around TikTok. Without committing to bleached brows, this hack gives the appearance of bleached brows.

6. Transplantation of eyebrows

As an alternative to wearing so much makeup, Chrissy Teigen announced on Instagram she had eyebrow transplants. You can enhance the fullness of your eyebrows by transplanting a hair graft (or plug) from the back of your head. What advice would she give Gen Z if she was a Gen Z? She believes it’s more of a commitment than buying a new eyebrow gel. You don’t want to do what I did and pluck them all off at once!”

7. Eyebrows that are straight

The tail is straighter and the arch is minimal, a classic style Audrey Hepburn loved and still popular with Zendaya and Cara Delevigne today.

8. Colored eyebrows

The addition of color to your eyebrows is an easy way to spice up your makeup and is definitely not boring. It is a good choice for makeup enthusiasts who enjoy experimenting, playing, and having fun.

9. The eyebrows of the 1990s

Is Bella Hadid right on trend with her skinny, low-arched brows from the ’90s?

10. Fox brow

Fox brows are a new trend, but they utilize a makeup technique that makeup artists have been using for decades. Using tape to make brows flatter is part of a side hustle that includes reshaping the face and lifting eyebrows. In addition to elongating the ends of their eyebrows with brow pencils, TikTok users have recreated the look in order to resemble Kaia Gerber or Kendall Jenner.

To know more about our services please visit price list page or contact us directly.

Microblading in Dubai

Microblading in Dubai – Getting the most out of it: Pros and Cons of the procedure​

Microblading in Dubai

Microblading in Dubai - Getting the most out of it: Pros and Cons of the procedure​

There is no doubt that you have heard about the eyebrow microblading in Dubai trend that has been shaking up the beauty industry for several years now.

This non-invasive procedure transforms sparse, light, and uneven eyebrows into natural-looking ones.

Microblading can give you flawless eyebrows, just as it does for celebrities and socialites. If you ever felt like you had brow envy and wondered how they achieved it, it’s probably because they’ve had their eyebrows done.

You’re probably wondering, what are the pros and cons of microblading? Before booking your microblading appointment, read this article to learn everything you need to know.

What Is Microblading, in a Nutshell?

This brow tattoo technique involves making thin incisions on the skin and imitating natural brow hairs using a microblading tool – a blade with several tiny needles. In microblading, artists can create brow hairs that mimic the length, color, thickness, and shape of the client’s natural brow hairs.

A tattoo won’t last forever – it fades over time and can be refreshed to prolong its life.

Here are some pros and cons of microblading

Despite its permanent nature, microblading fades over time. Several factors affect fade, such as your skin type and lifestyle, but most importantly, how rigorously you follow the aftercare routine prescribed by your technician.

If you are considering making an appointment with us, we strongly recommend that you take into consideration both the advantages and disadvantages. The following are some of the most important pros and cons of microblading that will assist you in making your decision.

What's great about Microblading in Dubai

A few of the most important benefits of microblading include its time and money savings, its long-lasting results, its waterproof properties, and the fact that it hides scars effectively. Here’s how it works:

Saves you time and money

Having your eyebrows microbladed eliminates the need for eyebrow products, which can be a real-time saver when applying makeup.

Additionally, you will save money on brow products and makeup removers by speeding up your morning routine. If you’re not particularly good at shaping your brows, you won’t have to worry about it anymore.

The results are long-lasting

With microblading, you can achieve the brows you’ve always wanted for months and even years. It is possible for microblading results to last up to 18 months or even longer if you follow proper aftercare routines and touch them up regularly.

Microblading Dubai

With waterproof eyebrows, you won't have to worry

The summer heat (especially in Dubai! ) isn’t the best time to wear eyebrow products if you have sparse eyebrows.

Getting your eyebrows microbladed makes sweating and getting wet a thing of the past. Finally, you won’t have to worry about smudging your eyebrows while swimming and diving.

Semi Permanent Eyebrows Aftercare

permanent makeup proud portfolio

Scars or hair loss can be covered with it

Scars on the eyebrows can be reduced in prominence by microblading. Those suffering from alopecia or cancer treatment-related brow hair loss can also benefit from it. The procedure is a great way to regain your confidence and achieve natural-looking results.

Here are the cons of Microblading

It’s important to look at both the pros and cons of microblading.

Microblading has a few cons to consider, such as healing and aftercare, infection and allergic reactions, being not the best option for oily skin, and being hard to remove. In more detail, here is what you need to know:

Healing can be a challenge

It is important to note that the healing process after your microblading treatment can last a period of six to eight weeks and can be an uncomfortable experience for some.

Your eyebrows can be itchy throughout this period and there will be some scabbing, so it is extremely important that you follow the aftercare instructions and avoid touching your eyebrows during this time in order to achieve the best results.

There is a risk of infection and allergy

Even though allergic reactions and infections are rare after microblading, they can occur.

Preventing allergic reactions can be achieved by performing a patch test beforehand. An infection can develop as a result of poor technique or inadequate aftercare. The signs of an infection are typically heavy scabbing, followed by inflammation, redness, and/or pus. Microblading is not an easy procedure and you need to make sure that you choose a professional artist and a professional place! 

If your skin is oily, microblading won't be a good choice

When it comes to microblading in oily skin, it usually does not last as long as it does on skin that is normal to dry.

As a result, it is also difficult to achieve crisp, defined strokes as well as the results start fading much sooner than they normally would have in a normal situation. It is still possible for you to get your eyebrows microbladed with an experienced artists, even if you have oily skin, but nano brows or powder brows are generally much better PMU options for you.

The removal process is not easy

Make sure you understand all the risks involved in microblading your eyebrows, as you might have to live with them for many years. The microblading on your eyebrows cannot be removed by yourself, but they will fade over time and can be professionally removed.

Are you a good candidate for microblading?

Consider the pros and cons of microblading before getting PMU and don’t make an impulsive decision.

If you don’t have the skill to make your eyebrows look even or just want to save some time when doing your makeup, microblading is a great option. If you have naturally thin and sparse eyebrows or are going through brow hair loss, this treatment is useful.

As long as you have normal to dry skin, you should be able to enjoy all the benefits of microblading and achieve the brow look of your dreams.

It should be noted, however, that microblading may not be a good option if you have oily skin. As an alternative, you can opt for machine brow treatments such as powder brows and nano brows since these treatments last longer and are particularly suitable for people with sensitive or oily skin.

Click here to learn more about microblading and other PMU treatments that are available.

Where to get microblading in Dubai?

Brows & Lips offer professional microblading and permanent makeup services, performed by the leading experts in the field in Dubai, United Arab Emirates. Each of our talented artists is extremely experienced and friendly. Our goal is to make you feel your best and make your life easier through permanent makeup. We don’t take this job lightly. Only the highest quality and care for our clients.

Please find the healing process and aftercare instructions here in our blog.

To know more or book a consultation or appointment please follow this microblading service link.

Ombre Lips Permanent Makeup

The Most Beloved Lip Blush Style: Permanent Ombre Lips

Ombre Lips Permanent Makeup

The Most Beloved Lip Blush Style: Permanent Ombre Lips

There are many ways to recreate your favorite lip makeup look permanently with lip blushing. The results don’t last forever, because they fade away after a couple of years, but for now, forget lip products except for chapstick.

In recent years, ombre lips have become one of the most popular lip PMU styles. Lip blushing, therefore, can keep up with makeup trends.

The ombre gradually transitions from intense and dark to sheer and light in the makeup world. How is this done on lips? Check out these stunning examples of ombre lip tattoos and learn how they’re done!

What is ombre lips permanent makeup?

An ombre lip is a style of lip makeup that involves coloring the outline of the lips – their edges – with a darker product, and filling in the rest of the lips with gradually lighter products, leaving the center of the lips the lightest. As a result, the transition is smooth and nicely blended, making the whole thing look really appealing.


Having the illusion of fuller lips without fillers is one of the reasons people like the look so much!


Various MUAs popularized this trend on Instagram (as they do with all looks), and it quickly spread throughout the world.


Unfortunately, creating flawless, tidy ombre lips takes a long time. In order to apply makeup with precision, you must have the right consistency. If is not too matte, so it’s impossible to blend, and not too runny, it’s impossible to apply evenly. A wide variety of shades is also a money pit.

Ombre lip tattoos are the logical consequence! By using lip blushing, PMU artists quickly mastered the ombre effect.


For big events like weddings and celebrations, you should try out ombre lips since single-tone lips are no longer in style. If you combine two shades of a dark and light tint, you will get a whole new color for your lips. Trying ombre lip treatments means you’ll no longer have to wear the same reds, neutrals, and pinks. To learn more about ombre lips, continue reading this page. Take a look!

Boost your natural beauty with ombre lips

A cosmetic procedure called Ombre Lips creates long-lasting 3D lip makeup. The term “ombré lips” refers to blending two distinct lipstick colors to create a faded appearance. The colors might flow from the outside of the lips to the inside or from the cupid’s bow to the outer lips to achieve a strong lip appearance.


  • Aside from enhancing your natural attractiveness, it can also improve your self-confidence.
  • You save a lot of time by not applying lip liner and lipstick every day.
  • Smudge-proof lips – Look your best even when it’s hot!
  • We provide the most advanced organic and mineral pigments and the most up-to-date equipment.

What is the process of ombre lip treatment?

As part of the micropigmentation procedure, permanent ink is injected into the skin using a professional tattoo pen. In the modern era of permanent makeup, blue lips are no longer possible because only soft, light techniques are used.

Organic or mineral pigments are used using a tattooing machine and a light powder (shade) technique. Like with any tattoo, the color will first look brighter or darker before fading. It usually lasts one to two years, depending on your skin type and lifestyle. Occasionally require top up sessions.

Semi Permanent Eyebrows Aftercare

permanent makeup proud portfolio

What is the purpose of getting Ombre lips?

Even without lip liner or lipstick, your lips always look gorgeous with an ombre lip treatment.

  • Your age or other health problems make it difficult for you to apply makeup.
  • You may have sensitive skin or allergies to conventional cosmetics.
  • It would be ideal for an always-on-the-go woman.
  • Swim, workout, shower, and wake up looking and feeling great.
  • Add some color and vibrancy to your lips.

It’s no longer necessary to pack your favorite lipstick since your natural youthful glow will be preserved. With ombre lips, your lips are given an extra boost of energy and color while retaining their natural shape. This is one of the most popular cosmetic procedures used to give the lips some color and define their contours. Lips with an ombre treatment are treated with two colors. Lips can become more defined and symmetrical by using this procedure.

Choosing the right color for ombre lips

In order to achieve the desired effect, it is essential to understand which two colors work well together. You should choose one color for your primary lip color. Once you have chosen your base color, pick a color lighter or darker than it. You should, however, ensure that the colors are comparable. For example, you can create the perfect ombre lip effect by using red lipstick and the darkest brown you have.

But to begin with, you should choose a dark brown or pink to go with your red. Use orange or brown lipstick for the ombre effect if you use a pink base. The key is to utilize two hues that may be blended to give your lips a gradient of color.

Conclusion

Everything is executed flawlessly and without a hitch! We take care to accomplish everything carefully. In our clinic, we start with a deeper shade on the inside (or outside) of the lips before moving progressively to a lighter shade. This ombré lip offers the appearance of larger lips and produces a fading effect.

FAQS

The treatment areas are numbed with a topical anesthetic as necessary. There may be some discomfort during the treatment, but this helps alleviate it. The level of pain varies from person to person. Since some people believe certain parts of the face are more sensitive than others, we specialize in making the customer as comfortable as possible. Your treatment will be painless thanks to the variety of topical anesthetics available.

Permanent makeup is usually a two-step process for areas like brows or lips. Lip tissue fades rapidly after the first treatment because it is different from other types of skin. Your lips will gradually lighten over the next few weeks. It is likely that your lips will appear paler than you would like at first, but pigment can darken and lengthen them at the follow-up appointment.

Please find the healing process and aftercare instructions here in our blog.

To know more or book a consultation or appointment please follow this ombre lips service link.

what is dark lips nautralization

Dark lip neutralization: how does it work?

what is dark lips nautralization

Dark lip neutralization: how does it work?

People often have dark spots on their lips due to trauma, smoking, or other circumstances, but for others, it is a cosmetic issue. Lipstick makes it easy to conceal, but some people don’t like to wear it or feel insecure when they do.

You’ve probably heard of lip blushing as a way to conceal a dark lip. Let’s take a look at the topic and see the amazing results of dark lip enlightenment.

Can dark lip neutralization be described in simple terms?

In recent years, lip blushing tattoos have become increasingly popular. The lips are gently layered with color using a professional device that injects the colors into the skin. Lip blush allows you to get smudge-proof permanent lipstick in your favorite shade that lasts up to five years.

Besides covering up scars, it can also even out uneven lips and improve a lot of cosmetic concerns. Read on to learn more!

Dark Lip Neutralization - Can It Make Dark Lips Lighter?

Black lips are caused by two main factors. A person’s genes, or ethnic lips, are the first factor to consider.

Your authentic self is what makes you most attractive. At Brows & Lips, we can remedy any defects you may detect. Lip neutralization may be beneficial for you if you are truly convinced that it will make you happier.

A second cause is if the lips have been damaged by an injury, malnutrition, hormonal imbalance, certain medications, excessive coffee consumption, or smoking.

Neutralizing dark lips: What does it involve?

There is a two-appointment procedure involved in permanent makeup. Enlightening dark lips may require 2 or 3 or even more sessions in order to achieve the desired result. Generally, it takes six to eight weeks for the lips to recover after the first tattooing, and a touch-up is necessary. People with dark lips, especially those from ethnic backgrounds, usually require several sessions to eliminate them.

It is possible to achieve a blushed appearance using colored lips, however, it is imperative to neutralize the color of dark lips in order to achieve this. Using a warm-based pigment will enhance the darkening of the lips and counteract the cool tones on the skin.

Adding a target color is possible after the lips have been neutralized and wholly healed.

It’s tough to get rid of black lips. This procedure should only be applied by professional artists who are well versed with color theory and have experience with dark lips. You can get rid of dark pigmentation on your lips with Brows & Lips and forget about it for 5 years. 

A step-by-step guide to neutralizing dark lips for lightening them

  1. Cool tones are complemented by warm hues. Each client has unique tones that should be taken into account. 
  2. Providing neutralization and balancing for dark lips. It takes between 1.5 and 2 hours to complete the procedure. 
  3. The healing period lasts about three weeks. As a result of healing, you get gorgeous, light, natural-looking lips! 
Semi Permanent Eyebrows Aftercare

permanent makeup proud portfolio

Does this method work for everyone who has dark lips?

There are some people who are not suitable for dark lip neutralization. If you have severe lip hyperpigmentation, you may notice that your lips don’t seem to be changing much. This is why most artists avoid working with lips that contain a high concentration of melanin. Only the most accomplished artists are capable of executing this technique due to its high level of skill and understanding. Hyperpigmented lips should be treated with caution since lip blushing might exacerbate the condition. It is no secret that Brows & Lips has an extremely experienced team of artists who are able to illuminate dark lips with ease. 

What is the most effective color to neutralize dark lips?

Choosing the neutralizing shade is up to the lip blush artist, as you do not have control over what shade works best for your dark lips. The right color will be chosen in accordance with whether or not the dominant tones are greyish, purple, or brown, so they will use the appropriate color.

A typical result of such a process is the appearance of a healthy, rosy, peachy complexion that looks as if it originated in nature.

Color on your lips will be applied once your lips have healed, and you will have the opportunity to select the shade of your choice.

What is the average time it takes for a dark lip blush to fade?

In terms of longevity, your lip blush will last from two to five years, depending on the tone of your skin and how dark your lips are. Eventually, the darker shade will reappear after a few years, and you will need to refresh the color.

Please find the healing process and aftercare instructions here in our blog.

To know more or book a consultation or appointment please follow this dark lip nautralization service link.

Fluffy Brows Dubai

The latest trend in the brow industry – Fluffy Brows

Fluffy Brows Dubai

The latest trend in the brow industry - Fluffy Brows

It’s no longer acceptable to have thin eyebrows. These days, full, fluffy, and textured eyebrows are in, and we’ll show you how to achieve them! If you have naturally thick or thin brows, we’ve picked out some of the best tools and advice from Senior Makeup Artists to help you achieve those on-point arches.

By the way, what are fluffy eyebrows?

It’s important to note that thick brows aren’t the same as fluffy brows. There is always a demand for the lamination treatment, which produces a brushed-up appearance and is like a perm for your eyebrows. Floppy eyebrows give the impression that they are not well-groomed because the hair hangs in an unruly manner but is properly formed.

Have you grown weary of your perfectly arched brows? You are exactly where you should be.

Despite your brows being naturally full and thick, and your arches being dense and well-formed, their pin-straight texture has always been something that needs improving. The dark hair lies clean and flat, which makes them an excellent choice when you want some fluffiness. In this case, you’re exactly where you’re meant to be.

The Key to Fluffy Brows Is Brow Lamination

This is a three-step procedure that we provide for brow lamination:

Hairs are secured in place by brushing on brow glue and allowed to grow upward.

  1. The hair cuticle is then relaxed with a softening lotion. You can shape your brows however you like since they are pliable.
  2. Professionals finish the procedure by applying a neutralizer (or fixing lotion) after repositioning the hairs. Technically, they work by dissolving and then rebuilding the disulfide bonds that prevent your hair from frizzing. Furthermore, keratin treatment, other hair perms, and lash lifts all operate in the same manner.)
  3. As a final step, your eyebrows are treated with a nourishing treatment that hydrates and conditions them.
Semi Permanent Eyebrows Aftercare

permanent makeup proud portfolio

What makes Brows & Lips special?

Brow lamination is becoming more popular because it can produce feathery, huge eyebrows. Even so, we make sure Brows & Lips procedures are done in a way that suits your brow, not just for fashion reasons.

Keeping the client satisfied means paying attention to the small details listed below.

  • Close gaps
  • Straighten downward-falling hairs
  • Control unruly hairs

Finding a provider for fluffy brows

If you’re interested in brow laminating, consider seeking the assistance of an aesthetician or licensed cosmetic artist. Treatments for brows are offered by these businesses. Find out if potential providers have experience with this particular operation. To discover more about our services, perform a search on our website.

Inquire about the following, regardless of the supplier you choose:

• Suggestions for further testing and potential adverse effects

Conclusion

Describe your perfect eyebrows with a few adjectives. What about “laminated”? You may have heard of terms like “feathery,” “HD,” or “natural.” Probably not. It is becoming increasingly popular to laminate eyebrows, a relatively new procedure. If you would like to wake up with perfectly arched eyebrows, you should look beyond the name.

What are the side effects of ombré brows?

There are no documented side effects of machine shading. The needle penetrates the skin less deeply than with a traditional tattoo. Semi-permanent treatments fade over time. When clients come from other places, we have seen color changes in the pigment under the skin over time. This can be caused by sun exposure or a bad choice of pigment by the brow technician. Be sure to research the establishment and the place you will be visiting before you get serviced.

FAQS

Approximately 30 to 45 minutes are required for the entire procedure. Waiting 48 hours before getting your eyebrows wet can extend the effect’s duration by six to eight weeks.

For those with excessively thin or over-plucked brows or who want a different shape and additional hair on their brows, microblading may be a better choice.

The procedure may be repeated every six to eight weeks. The skin around your eyebrows and the eyebrows themselves may suffer damage if you do this more frequently.

Please find the healing process and aftercare instructions here in our blog.

To know more or book a consultation or appointment please follow this fluffy brows service link.

Permanent Lip Blush Tattoo

How to get a semi-permanent lip blush color tattoo

Permanent Lip Blush Tattoo

HOW TO GET A SEMI-PERMANENT LIP BLUSH COLOR TATTOO

It has been a few years since cosmetic tattooing made significant progress. In contrast to the harsh lines and vibrant colors of the past, cosmetic tattooists can now create permanent and semi-permanent makeup that appears as natural as possible. Pigmentation and skin discoloration can also be treated by a cosmetic tattoo.

Lip blushing, also known as lip blush tattoos, is a relatively new makeup technique used by makeup artists and stylists to enhance certain features of the face. Both high-end salons and medical clinics offer this cosmetic tattoo service.

What does it mean to get a semi-permanent lip color tattooed?

The cosmetic tattooing of the lips, known as lip blushing, gives them a faint tint of color. There is usually a two-to-three year lifespan for lip blush tattoos. Using lip blush, you can hide scars, correct minor symmetry issues, and increase the volume of your lips by 30–40%. Two additional benefits include adding a tint of natural lip color and enhancing overall lip contour.

In addition to treating cosmetic concerns like hyperpigmentation or skin irregularities that cause people discomfort, lip bushing can also address more serious aesthetic concerns.

The experts at Brows & Lips suggest using lip blush to add color to areas of the lips that are lacking pigment as well as to lighten or darken lips that are too dark or with cool undertones. Lips appear fuller and more consistent in shape when they have the right amount of color in the areas around their mouths.

Lip blush tattoos are less pigmented than traditional tattoos, which use far higher concentrations of pigment.

Lip Blush Tattooing involves the following steps:

The process of creating a lip blush tattoo takes approximately two hours from start to finish. Numbing cream is applied at the beginning of the appointment and left on for about 20 minutes.

Before the tattooing technique begins, the shape is drawn with a bright red or pink lip liner.

To relieve clients’ discomfort, numbing cream is reapplied twice or three times over their lips using a mild shading technique.

When the treatment is completed, ointments are applied to moisturize and calm the lips.

Is it painful to have a semi-permanent lip blush color tattoo?

Lip blushes are generally rated as 2-4 on a scale of 1-10 in terms of pain; numbing merely enhances it. There isn’t even a lot of discomfort. We are able to put our patients to sleep during this procedure.

Lip blushing machines are less painful than traditional tattoo machines because they only operate on the skin’s surface.

Semi Permanent Eyebrows Aftercare

permanent makeup proud portfolio

The healing process of a semipermanent lip blush tattoo

In terms of the healing time of a lip blush tattoo, it may take anywhere between four and seven days for the tattoo to fully heal. At Brows & Lips, clients receive an aftercare package and instructions following their procedure.

As soon as the lymphatic system receives a tattoo, lymphatic fluid begins to be produced. Use the provided sterile water wipe to clean the lips five to six hours after the lip blush procedure before applying the moisturizer.

Use sterile wipes and moisturizer in the morning, and repeat the process in the evening.

Customers who have lip blush tattoos may experience minor edema after the procedure. When it comes to swelling, every consumer is different; some expand like balloons while others barely expand. Several hours later, the swelling subsides and the following day, its size returns to normal.

You should keep the area moisturized with the ointment or moisturizer provided by your aesthetician after getting a lip blush tattoo. Keep your lips moist throughout the healing process. Make sure they don’t get damaged or dry out. During the healing process, only Aquaporin, Vaseline ointment, or coconut oil should be used as a moisturizer. Lipstick and lip gloss should also be avoided while the lips are healing.

Please find the healing process and aftercare instructions here in our blog.

To know more or book a consultation or appointment please follow this lip blush service link.

Ombre Brows

What are semi-permanent ombre brows and how can they enhance brow shape?

What are Ombre Brows

What are semi-permanent ombre brows and how can they enhance brow shape?

Most beauty lovers find it stressful to precisely fill in their eyebrows in the mirror. You can enjoy low-maintenance eyebrows for up to three years with Ombre shading. Check out the rest of the article if you are looking for more brow drama.

Natural, yet striking look with ombre brows

To create the ombre effect, the eyebrow has a dark arch with faded lighter tones at the front. For those seeking the look of freshly applied makeup, this brow choice is just right.

Using this waterproof and smudge-proof treatment, brows will be filled and designed according to your preferences.

Brows & Lips’ semi-permanent makeup artists can perform the best ombre eyebrow treatments in the UAE. Our signature semi-permanent ombre eyebrows are designed to give you well-groomed brows that will last for one to three years.

What are the benefits of ombré eyebrows?

  • Ombre shading is suitable for sensitive or oily skin
  • Fewer touch-up appointments are required
  • Provide a fuller, more defined brow appearance

In addition to being friendly to all skin types, ombre brows are an excellent investment. Women with sparse or no brow hair often have difficulty filling in their brows. A service like this saves time in the mornings, saves money, and is helpful when filling them out. Additionally, you can specify the density of the brows, which means how light or dark you want them to be.

How long Ombre Brows last?

Due to the deeper insertion of pigment, it tends to last longer and is more suitable for those who have oily skin or have no brow hair, to begin with.

There is a three-year shelf life for permanent makeup. For maximum color results, a top-up appointment is needed 4-8 weeks after the initial procedure.

There are a few factors that will affect the longevity of your ombre eyebrow:

  • The color of the pigment
  • The type of skin you have
  • The lifestyle
  • A skin care regimen

For beautiful-looking brows that last, visit Brows & Lips in Dubai.

Semi Permanent Eyebrows Aftercare

permanent makeup proud portfolio

Permanent Ombre Brows Tattoo, Is It Painful?

Ombre brow treatments feel similar to getting your eyebrows threaded. Our technicians apply a numbing order to ensure your comfort during the brow treatment, our technicians apply a numbing agent to the brow area beforehand.

Detailed information about aftercare is provided.

It takes 1-2 hours to make sure the pigment is correct, the shape is perfect, and the shaded effect is just right for you.

We at Brows & Lips are committed to providing you with defined eyebrows that revitalize your appearance. Let us captivate your natural beauty with our Ombre eyebrow treatment.

We will discuss your desired brow aesthetic during your consultation at our salon. Our job is to examine your eyebrows and design new brows that complement your face shape.

  • Before the procedure, we’ll apply makeup to your brows to make sure you’re happy with the color and form.
  • Next, we choose the correct color for you. When two distinct tones of the same color are mixed together, the resulting ombre effect is smooth and natural-looking.

Depending on your skin type, semi-permanent ombre eyebrows require a healing period of 10 days. A complete post-treatment instruction sheet will be provided by your artist. Additionally, we offer a variety of products to assist you in caring for your new Ombre Eyebrows.

How much does Ombré Brows Shading cost in Dubai?

AED 1500 is charged for the treatment, followed by AED 500 for the retouch after a month. We recommend that clients arrive at their appointments well rested and bare-faced. It is important to stay away from anything that may thin the blood 48 hours before the service. Until after the procedure, stop drinking alcohol, taking pain relievers, taking specific medications, or getting Botox. In fact, blood-thinning agents thin the blood, which causes you to bleed more than normal, resulting in poor pigment retention.

Ombré Shading: What to Expect

As a client, you should expect to feel comfortable and at ease during the appointment. This is very important to us. You are getting tattooed on your face after all!

A topical anesthetic will typically be applied by your professional and allowed to sit for 10-20 minutes before shading. While it numbs you, it is uncomfortable because you are abrading the skin. An artist will draw a frame around your brows to determine where pigment will be applied. Prior to applying the pigment to your skin, you will be able to see the shape and color. The shading of your customized brows can begin as soon as you agree and confirm the look. Your eyebrows will look darker after the procedure, and they may feel tender as well.

What are the side effects of ombré brows?

There are no documented side effects of machine shading. The needle penetrates the skin less deeply than with a traditional tattoo. Semi-permanent treatments fade over time. When clients come from other places, we have seen color changes in the pigment under the skin over time. This can be caused by sun exposure or a bad choice of pigment by the brow technician. Be sure to research the establishment and the place you will be visiting before you get serviced.

Please find the healing process and aftercare instructions here in our blog.

To know more or book a consultation or appointment please follow this ombre brows service link.

dark lip neutralization whitening

How Does Dark Lip Neutralization Work

dark lip neutralization whitening

How Does Dark Lip Neutralization Work?

People often have dark spots on their lips due to trauma, smoking, or other circumstances, but for others, it is a cosmetic issue. Lipstick makes it easy to conceal, but some people don’t like to wear it or feel insecure when they do.

You’ve probably heard of lip blushing as a way to conceal a dark lip. Let’s take a look at the topic and see the amazing results of dark lip enlightenment.

Can dark lip neutralization be described in simple terms?

In recent years, lip-blushing tattoos have become increasingly popular. The lips are gently layered with color using a professional device that injects the colors into the skin. Lip blush allows you to get smudge-proof permanent lipstick in your favorite shade that lasts up to five years.

Besides covering up scars, it can also even out uneven lips and improve a lot of cosmetic concerns. Read on to learn more!

Dark Lip Neutralization - Can It Make Dark Lips Lighter?

Black lips are caused by two main factors. A person’s genes, or ethnic lips, are the first factor to consider.

Your authentic self is what makes you most attractive. At Brows & Lips, we can remedy any defects you may detect. Lip neutralization may be beneficial for you if you are truly convinced that it will make you happier.

A second cause is if the lips have been damaged by an injury, malnutrition, hormonal imbalance, certain medications, excessive coffee consumption, or smoking.

Neutralizing dark lips: What does it involve?

There is a two-appointment procedure involved in permanent makeup. Enlightening dark lips may require 2 or 3 more sessions to achieve the desired result. Generally, it takes six to eight weeks for the lips to recover after the first tattooing, and then a touch-up is necessary. People with dark lips, especially those from ethnic backgrounds, usually require several sessions to eliminate them.

It is possible to achieve a blushed appearance using colored lips, however, it is imperative to neutralize the color of dark lips to achieve this. Using a warm-based pigment will enhance the darkening of the lips and counteract the cool tones on the skin.

Adding a target color is possible after the lips have been neutralized and wholly healed.

It’s tough to get rid of black lips. This procedure should only be applied by professional artists who are well versed with color theory and have experience with dark lips. You can get rid of dark pigmentation on your lips with Brows & Lips and forget about it for 5 years. 

Semi Permanent Eyebrows Aftercare

permanent makeup proud portfolio

A step-by-step guide for dark lips whitening

  • Cool tones are complemented by warm hues. Each client has unique tones that should be taken into account. 
  • Providing neutralization and balancing for dark lips. It takes between 1.5 and 2 hours to complete the procedure. 
  • The healing period lasts about three weeks. As a result of healing, you get gorgeous, light, natural-looking lips! 

Does this method work for everyone who has dark lips?

There are some people who are not suitable for dark lip neutralization. If you have severe lip hyperpigmentation, you may notice that your lips don’t seem to be changing much. This is why most artists avoid working with lips that contain a high concentration of melanin. Only the most accomplished artists are capable of executing this technique due to its high level of skill and understanding. Hyperpigmented lips should be treated with caution since lip blushing might exacerbate the condition. It is no secret that Brows & Lips has an extremely experienced team of artists who are able to illuminate dark lips with ease. 

What is the most effective color to neutralize dark lips?

Choosing the neutralizing shade is up to the lip blush artist, as you do not have control over what shade works best for your dark lips. The right colour will be chosen in accordance with whether or not the dominant tones are greyish, purple, or brown, so they will use the appropriate colour.

A typical result of such a process is the appearance of a healthy, rosy, peachy complexion that looks as if it originated in nature.

The colour on your lips will be applied once your lips have healed, and you will have the opportunity to select the shade of your choice.

What is the average time it takes for a dark lip blush to fade?

In terms of longevity, your lip blush will last from two to five years, depending on the tone of your skin and how dark your lips are. Eventually, the darker shade will reappear after a few years, and you will need to refresh the color.

Please find the healing process and aftercare instructions here in our blog.

To know more or book a consultation or appointment please follow this lip-blushing service link.

lip tattooing

Treat you Lips with Lip Tattooing

lip tattooing

TREAT YOUR LIPS WITH LIP TATTOOING​

Cosmetic lip tattooing, often known as permanent makeup, is an option for women who want to change their lip colour or make their lips more defined, even, and fuller. We offer permanent and semi-permanent lip tattoos that can be used as a cosmetic lip enhancers. In time, our lips thin and lose their definition and color.

RESULTS THAT LAST LONGER AND ARE MORE EFFECTIVE

After receiving permanent lip tattoos, your lips will appear fuller and more enticing. Lip tattoos are also more long-lasting and effective than dermal fillers in terms of improving the appearance of the lips. Having their lips tattooed beforehand creates a nice contour for women considering injectable and gives injectors advice. Contact us right now to find out how we can help you.

WHAT IS THE PROCESS OF A LIP TATTOO?

Before your lip tattoo appointment, the tattoo artist will create a drawing of your selected design. A line will be drawn around the part of your lips you’ve selected.

Next, your artist will puncture your skin with sterile needles to introduce the precise ink colours in a progressive, scientific manner. When the tattoo is complete, your lips will be covered with a sterile bandage to prevent infection.

Expect some blood and pain during the process. A lip tattoo may be more painful than a tattoo on another body region, such as the arm or leg.

Before leaving the studio, ensure you are familiar with the aftercare instructions because it can take up to two weeks for a new tattoo to heal fully. Because you can’t wash your mouth with soap, you’ll need an antimicrobial mouth rinse to keep it clean.

PRE-TATTOOING INSTRUCTIONS FOR LIPS

Those who want to acquire lip tattoos should be aware of the following warnings:

  • Avoid taking aspirin or ibuprofen for two days before or after the tattoo lips permanent makeup procedure.
  • It is always best to check with your doctor before discontinuing any medication.
  • Lip tattoos, whether permanent or temporary, should not be gotten the night before.
  • Make sure your therapist knows if you are allergic to any substances. An allergy patch test is required because some people may be allergic to skin pigment.


  • Lysine tablets should be taken 3 to 5 days before the procedure. Please use this if you’ve previously had a cold sore.
Semi Permanent Eyebrows Aftercare

permanent makeup proud portfolio

AFTERCARE INSTRUCTIONS FOR LIP TATTOOS

If you get a lip tattoo, here are some things to look forward to:

After the surgery, your lips will be puffy and uncomfortable for a few days. It will appear much darker than the colour you chose during the consultation.


  • Full lip operations take longer to heal and produce more pain, oedema, and stiffness than liposuction procedures.
  • Even if you’ve only ever had one cold sore, you’re more likely to have another one. Pre- and post-treatment lysine supplementation is recommended. Overtax cream is another choice as well.
  • For those who have had permanent lip colour, it’s not uncommon for up to 60% of the colour to disappear after the initial application.


FAST FACTS ABOUT LIP TATTOOING

About:

Lip tattoos can be applied to the lips’ inside or outside. Permanent cosmetic tattooing on the lips is also an option.

Safety:

You can minimize problems by selecting a reliable tattoo artist and shop. However, infections are more common with this type of tattoo since it is harder to keep them clean.

Convenience:

It is painful to get a tattoo near the mouth because of its sensitivity.

Efficacy:

When it comes to lip tattoos, they fade more quickly than those on other parts of the body. A touch-up every few months is possible, even if your tattoo is meant to last for years.

IS THERE ANYTHING WE CAN DO FOR LIP BLUSH?

Once your lip tattoo fades, you’ll need a touch-up to keep the design looking its best. Because of the chance of fading, you should plan on getting a touch-up every few months.

It’s not always necessary to start over from scratch, though. In certain cases, a fading tattoo may need minor touch-ups, such as adding new colours.

If you’re looking for an entirely new look, consider getting your lips tattooed. This is a common occurrence with permanent makeup.

Please find the healing process and aftercare instructions here in our blog.

To know more or book a consultation or appointment please follow this lip-blushing service link.

share of pink lip blush

Shade of Pink to Enhance the Beauty of your skin

shade of pink lip blush color

SHADE OF PINK TO ENHANCE THE BEAUTY OF YOUR SKIN

The semi-permanent cosmetics fashion is currently widespread in the nation. Many individuals prefer this type of makeup because of its long-lasting properties and because it doesn’t irritate the skin. Most women prefer semi-permanent lip blush since it saves time while still delivering a natural-looking tint and is gentle on the delicate skin of their lips. Only a semi-permanent lip blush may be depended upon to not injure the delicate lip skin. Semi-permanent lip blush is the only treatment that can be relied on not to harm the delicate lip skin. On the other hand, picking a lip pigmentation tone might be tricky. Professionals may advise you which color would look best on your face, so you should be careful and call them.

LIP BLUSHING - WHAT IS IT, AND HOW DOES IT HAPPEN?

As with a semi-permanent tattoo, lip blushing improves your natural lip color and shape to create the illusion of fullness. Your natural lip line is followed meticulously as the colored ink dissolves into your mouth. And the most significant thing is that the results seem like they came straight from nature.

PRECIPITATION TIME FOR LIP BLUSHING

Lip blushing can last up to two years. However, individual results may vary due to skin tone and pigmentation changes. Color fades more quickly if they smoke or engage in other harmful behaviors. As the sun’s rays fade the implanted pigment, so does its effect. Experts say that this treatment should be repeated regularly to maintain the remarkable effects. Because the procedure is semi-permanent, it is nearly hard to remove it if you are not satisfied with the final results.

FACTORS TO CHOOSING A COLOR?

Lips are a highly unique feature. It’s all up to you and what kind of lips you have in your head that you want to see come to life. Some people opt for brighter colors like red or orange to make a statement with their lips. There are a few factors to consider when selecting a blush color, the most important of which is your skin tone. Consider your skin tone and the colors that go well before buying anything.

It’s essential to keep an eye out for the following.

Undertone:

• To understand which colors look best on your skin, determine your skin’s undertones.
• Observe the veins in your wrist closely for signs of stress.

Your skin has a noticeable yellow undertone. However, blue, chilly and pink undertones are present. In yellow undertones, these undertones are absent. The majority of colors will look amazing on you because of your light skin tone. Because you have a fair skin tone, most colors will look excellent on you, even if the undertones are blue or green.

Semi Permanent Eyebrows Aftercare

permanent makeup proud portfolio

Different Shades That Work for Different Skin Colors

For people with a fair complexion, toned-down lip tints are the ideal option. Pink and peach tones are among the many shades under this umbrella. The best advice for those with fair skin is to stay away from deep reds and browns.
Yellow and other warm tones go well with olive skin. Purples and browns will make you appear too similar in color if you have a yellow undertone. Reds like sunset, coral, and even amber are usually excellent for portraits.
• People with fair skin
• People with pale skin are more likely to have coral hues. You may select several coral and red hues to achieve the desired effect.

• Skin tones that seem dark.
• The actual color lips is obscured by the presence of blue undertones in their skin tones. Instead, you might use a dark orange foundation to obtain the correct color match.

Please find the healing process and aftercare instructions here in our blog.

perfect skintone shade makeup

How to Find the Perfect Shade for Your Skin Tone

perfect skintone shade makeup

How to Find the Perfect Shade for Your Skin Tone

Pink is the perfect shade for every occasion, whether you want a bold or natural-looking lip. Because of this, it may be difficult to find the right shade of foundation for your skin tone. It’s a good thing you have the help of your cosmetic cheerleaders. On top of that, we’ll teach you how

to use your newly acquired knowledge of beauty to find the perfect pink lipstick!

When Choosing a Shade of Makeup, Consider Your Skin Tone First

First, you need to understand your skin’s undertone, which is the colour immediately under your skin. Why? Your undertones determine which colours will best emphasize you’re natural features. If you have this information handy, you’ll be well on finding the perfect match.

MEASURING YOUR VEINS CAN HELP YOU IDENTIFY YOUR UNDERTONES

If you’re unsure about your skin tone, look at your wrist arteries. What color are they?


Streams of blue

Blue veins represent pink undertones.


Veins with a leafy appearance

Green veins show yellow undertones.


Veins that are green and blue

Both blue and green veins suggest neutral undertones (equal parts pink and yellow).


YOU’RE JEWELRY IS A WAY OF IDENTIFYING YOUR UNDERTONES


  • Sterling silver jeweller

Silver jeweller looks best on skin with cooler, pinker undertones.


  • Gold-plated items

Gold jeweller looks best on skin with warmer, yellower undertones, such as tan.

USE YOUR SKIN COLOR AS A GUIDE

After determining your skin tone, the next step is to find the perfect pink lipstick for you. The three most common skin tones are fair, medium, and dark. Alabaster, porcelain, light, and pale are all phrases you’ll see in the name of your foundation if you have fair skin. Continue reading if you aren’t influenced by it.

Semi Permanent Eyebrows Aftercare

permanent makeup proud portfolio

PINK LIPSTICKS FOR FAIR SKIN TONES: WHEN TO USE THEM

When picking a pink lipstick for fair-skinned women, it’s important to know your undertones.

  • FAIR SKIN WITH PINK UNDERTONES

If you have a fair skin tone with pink undertones, use Barbie or candy-coloured pinks to bring out your undertones. Peachy pink, on the other hand, will soften your look by lowering your undertones significantly.

  • FAIR SKIN WITH YELLOW UNDERTONES

Colours like coral are best for ladies with light skin and yellow undertones, according to our experts. You may try many different formulas, from the delicate and sheer to the harsh and intense.

For fair-skinned girls, we’ve made a list of some of our favourite pink lipsticks.

PICKING A PINK LIPSTICK THAT GOES WELL WITH YOUR MEDIUM SKIN TONE

That’s great! You may wear every color under the sun if you have a medium skin tone, sometimes known as an “olive” or “tan” complexion. We can’t help but be envious.

Your skin’s undertones are often neutral, so you don’t have to stress about finding the right shade. Everything is going to look great.

For individuals with medium skin, this is the only option. Pink lipsticks with blue undertones should be avoided. Because of the blue and purple undertones, you will seem washed out. Instead, she recommends opting for a nude-like pink or a sparkling watermelon shade.

IF YOU HAVE A MEDIUM SKIN TONE, CHOOSE ONE OF THESE LIPSTICKS FOR THE PERFECT POUT:

Pink Lipsticks are best for medium skin tones.


The Real Deal in Pale Pink.

Unlike a gloss, Pink in Devotion has a brilliant shine without stickiness. The product contains hyaluronic acid, which seals moisture for up to eight hours. With only one stroke, your lips will feel soft and kissable, thanks to its emollients and antioxidants.


A Pure, Unadulterated Shade of Pink

This pink lipstick is perfect for wearing regularly. Natural lip colour is not as good as lipstick. Just a few of the ingredients in its formula include Omega 3, Vitamin E, and Argan oil. Your lips will be soft and moisturized, and they’ll seem full and lovely.

A GUIDE FOR DARK SKIN TONE GIRLS TRYING TO WEAR PINK LIPSTICK

If you have a dark complexion, try these pink lipsticks:

A Vibrant Shade of Pink

Our compulsion is all things Explicit Pink. Our characteristic formula is antioxidant-rich and very moisturizing, so your lips will look great all day.


Fuschia is a vibrant and eye-catching color.

When experimenting with the color, choose Sensational Creamy Matte Lip Color in Faint For Fuchsia. You’ll receive a smooth, matte finish with a creamy texture. Best of all, the superior oils in this pink lipstick will keep your lips soft and supple all day.

shaded eyeliner permanent

Shaded Eyeliner Treatment is an Effective Solution for Eyeliner Woes

permanent shaded eyeliner

SHADED EYELINER TREATMENT IS AN EFFECTIVE SOLUTION FOR EYELINER WOES​

A semi-permanent method known as Shaded eyeliner may help you obtain a well-defined and shaded look for your eyes. With this approach, applying eyeliner doesn’t have to be a time-consuming procedure. Working with a therapist makes it possible to achieve significant yet natural-looking results.

Shaded Eyeliner: What It Is and How It Can Be UseD

Within a short period, you’ll notice a significant change in how you look. Makeup bags are not completed without kohl, drawing attention to and highlighting a woman’s eye area. Distinct eye shapes necessitate different eye linings. ” Thus, our artists will be the ability to modify your style based on your current traits. Our therapists will use blending talents during the procedure to produce a custom-made lining for your face.

We may now experiment with various eyeliner styles and colours thanks to improvements in the cosmetics sector. Therapists at our spa can aid you in picking the perfect colour and thickness of mascara to match your features. You can rely on us to assist you if you know what you want.

Expectations of healing Process

Most people should know what to expect at each step to speed up the healing process.

  • Scabbing has been a problem for many people.
  • If you observe scabbing on your skin, don’t panic. No issue because it’s a natural component of the healing process.
  • You should only be concerned if the scabbing continues for more than a week.
  • Even if the scab looks attractive, it is essential to avoid scratching or picking at it. Allow the scab to fall off on its own as a result of the injury.
  • There might be swelling, redness, or itching for a few days following the procedure.
  • Avoid touching it in any way as a general rule.
  • Even a little irritation might trigger an infection in the hair follicles.

Techniques

  • Aftercare is more important than preparation when it comes to maintaining the health and beauty.

    Here are some suggestions for Aftercare.

    • There is a chance that sweating might hinder the healing process because it is a kind of water.
    • Applying cosmetics when the skin is healing is the final item to remember.
    • The skin’s pores are clogged by makeup, making it harder for it to repair.
    • If your face is oily, your makeup will wear off more quickly and last less time.
Semi Permanent Eyebrows Aftercare

permanent makeup proud portfolio

EYELINER TATTOO Aftercare

The delicate shading used by our salon’s makeup experts creates a look that is both natural and draws attention to your eyes.

To provide the illusion of thicker lashes and an even waterline, a thin line of colour is painted across your eyelids. To get a darker look, we’ll use blending methods. Your pupils will enlarge even more as a result of this. To create a dramatic look, we first line our eyes with black and then apply a darker shade to our eyelashes. You should avoid using eye irritants like mascara, water, and other cosmetics on your eyes for the first three to seven days after therapy.

You won’t have to spend hours refining your eyeliner appearance with a shaded eyeliner. You can achieve the smoky eyeliner effect without the hassles by using semi-permanent eyeliner.

Please find the healing process and aftercare instructions here in our blog.

Steps to improve lips color

Steps to Improve The Shape and Colour of Your Lips

Steps to improve lips color

As with tattooing ink or ordinary dye, semi-permanent lip blushing involves the application of pigment to the lips like lipstick or lip gloss to get a natural-looking color that won’t budge. If you want your lips to appear full and gorgeous, you must pick the perfect shade according to the thickness of your lip shape. Lips may be defined, symmetrical, and colored naturally with this method. Contouring and coloring are also a part of this process.

WHO SHOULD PERFORM THE SHAPING OF YOUR LIPS?

The method should never be performed by an inexperienced artist or by a non-specialist in the field. You should do considerable research and look at the artist’s previous work to ensure you’re in excellent hands before hiring them. Ask plenty of questions and acquire before and after pictures before you consent to any surgery. Ask about the safeguards they’ll take until your gut tells you to go through with the treatment, as changing your lips is a sensitive procedure.

Semi Permanent Eyebrows Aftercare

permanent makeup proud portfolio

WHAT HAPPENS DURING A LIP BLUSHING TREATMENT?

Sit down with an expert and learn about all aspects of the process before deciding so that you are aware of the benefits and downsides and can fully embrace them. Describe the color you want, and bring a picture of your favorite lip liner or any other product to which you want to compare it. Check with them to be sure your skin tone and lip shape won’t be a disappointment. Why? Because it is essential to consider the skin’s natural undertones. Using lip pigment is like working with makeup and creating a stunning shade by mixing several colors.

A technique known as lip neutralization is utilized to counterbalance the darkness of a person’s lips. Professional artists utilize warm pigments injected into skin tissues to lessen intrinsically dark color.

While the expert’s primary duty in lip blushing is to provide fullness and symmetry to the lips, it’s crucial to remember that professionals can’t remove the natural border entirely, and exaggerating the lips is never the expert’s responsibility. By outlining the lips with a nude liner around the area of lips that has to be flushed, trained artists undertake a process described as shaping or mapping. Because everyone’s lips are unique in terms of their texture, tone, and quality, the technique used to apply the blush will vary from person to person. Pigment balance and correction is a more involved process for certain people. Finally, it is completely sealed and waterproof.

IS LIP BLUSHING TATTOO PAINFUL?

To alleviate discomfort, stop bleeding, and minimize swelling, a popular local anesthetic is administered to the lips, beginning at the margins and working its way over the entirety of the skin tissue. This procedure also helps relieve pain. The pigment is carefully injected into the lip tissues’ first layer using a computerized instrument and a sterile Nanoneedle. This process requires great attention to detail. “pixelating” involves implanting microscopic dots into the tissues to establish a layer of coverage and hue. When additional colors are added, the pigment becomes more prosperous and saturated, which ultimately leads to pixels that are closer together. The repetition and meticulous attentiveness that is necessary during this step account for the majority of the wasted time that will be incurred throughout the operation. After the operation, which takes around an hour, a healing balm will be applied to your lips to provide comfort.

Please find the healing process and aftercare instructions here in our blog.

Uncover the Numerous Benefits of Semi-permanent Lip Blush

Semi-permanent lip blush

uncover the numerous benefits of semi-permanent lip blush

Everyone is curious about their Beauty, not for now, but from the very 1st day of Human civilization; Beauty is nothing but skin-deep. We shouldn’t judge anybody by their physical appearance, but it is hard to ignore how a person looks; the face is the 1st impression. We should deal with our body in natural ways, but many artificial ways are introduced to enhance our physical Beauty.

Introduction:

Face Beauty is the 1st thing that comes to mind when we think of Beauty. Lips are the most critical but ignorant part when we start valuing Beauty. There are many natural and artificial ways to make our lips more noticeable and beautiful. Lip blush is one of them. People do many things to care for their lips. In the ancient era, people used to prick their lips with needles so that they looked attractive.  

What is Lip blush?

Lip Blush is something like tattooing. It is the type of an ancient technique but in a modern way. The semi-permanent enhances the colour of the lips. It injects tints or balms that enhance the Beauty, and you don’t need to apply lip colours or glosses regularly. His process involves continuously pricking the lip with a needle in the machine that goes in and out and deposits the lip colour under the layer of skin. Its results last for 2 to 3 years.

Procedure: 

The Lip colour or balm of your choice will be injected into your lips with the help of a machine with needles. Your artist applies numbing cream on your lips and lets it rest for a few minutes. After that, we start injecting the lip colour; the procedure is fast and short in time; it is not much pain, but maybe after the procedure, you face minor irritation or any aftereffect like swelling which will not last for more than 30 minutes.

Semi Permanent Eyebrows Aftercare

permanent makeup proud portfolio

Benefits of lip blushing:

There are many benefits of lip blushing few are discussed as under:

Semi-permanent lip colour is not permanent, and you can get rid of it when you are bored. It lasts only 2 to 3 years, and colour fades out by itself. No need for “after procedures”.

  • Slow down the process of ageing

It helps to slow down ageing and increase pigmentation pale. It helps your lips look fresh and soft for a long time. Which automatically helps you look young. 

  • Customize the shade

The best thing about it is to select your go-to shade. You can choose any shade and get it customized, too; you can make it glow, nude, or whatever you want.

  • Fuller-looking lips

It gives your lips a fuller look. It fills your lips without any surgery or painful process. No heavy injectable procedures will be used in this.

  • No more uneven lips

You will get rid of un-toned skin, and your lips will look fine and even, making you more confident and beautiful.

  • Instant benefits

It will only take 10 to 15 days to settle down the colour. No need to wait for too long to enjoy your beautiful look. You get the lip blushing and ready to go.

  • Not so costly

It is not such a costly procedure. You can get it done under your budget without worrying about aftercare costs.

  • Safe

It is safe to get this done. No after-effects or difficulties during the procedure.

  • Painless procedure

It is painless because they apply numb creams before starting it, but a different person can have a different reaction.

  • No special aftercare

There is no special aftercare for it. You can just use ice packs to reduce the redness and swelling. 

Summary:

Lip Blushing is a semi-permanent painless process. It is not costly and doesn’t have noticeable side effects. It helps you live confidently and young.  

Please find the healing process and aftercare instructions here in our blog.